arrow-left

All pages
gitbookPowered by GitBook
1 of 6

Loading...

Loading...

Loading...

Loading...

Loading...

Loading...

Python's Default Argument Values and Lists

Have you ever written a function that used a list for a default argument value, only to have weird things happen?

And it's not just with lists--the problem manifests with any mutable data type when it is used as a default argument value.

Here's what happening, and here's how to fix it.

Check out these two pieces of identical code, one in Python and one in JS.

The code is supposed to append 1 to whatever array you pass in. And return it. And if you don't pass an array, it sets the array to empty by default:

and JS:

If I run them, look at the output of the JS, which is as-expected:

and look at the output of Python, which is not expected!

What's going on?

This all has to do with when the default value is created.

Javascript creates the default empty [] when the function is called. So each time you call it, it makes a new empty array. Every call returns a different array.

Python creates the default empty [] when the function is loaded. So it gets created once only when the program is first read into memory, and that's it. There's only one default list no matter how many times you call the function. And so foo() is returning the same list every time you call it with no arguments. This is why another 1 gets added on each call--.append(1) is happening to the same list every time.

Indeed, if you run this in Python:

You'll get True, since the same list is being returned.

The fix is to use None as a substitute, and then take special action to create a new list on the spot.

And then we get good output:

Now, if we had a function that used an immutable value as a default argument, we have no problem even though the same process is happening.

In that code, there's only one "hello!". It gets created when the program is first loaded, and never again. All calls to the function return the same "hello!".

So how is that OK, but it's not OK with a list?

It's because we only ever notice there's a problem when we modify the data. And since we can't modify "hello!", there won't be a problem.

Put another way, we simply don't care if variables are pointing to the same "hello!" or to different "hello!"s. We cannot tell the difference.

But with something mutable like a list, we certainly can tell, but only after we mutate it and see if it only affects one variable, or if it affects them all.

def foo(a=[]):
    # ... do something with `a` here ...
    return a
def foo(a=[]):   # BAD
    a.append(1)
    return a

x = foo()
print(x)

y = foo()
print(y)

z = foo()
print(z)
function foo(a=[]) {
    a.push(1);
    return a;
}

let x = foo();
console.log(x);

let y = foo();
console.log(y);

let z = foo();
console.log(z);
$ node default.js
[ 1 ]
[ 1 ]
[ 1 ]
$ python default.py
[1]
[1, 1]
[1, 1, 1]
foo() is foo()
    if a is None:
        a = []   # Make a new list right now, every time the function is called with no args
    a.append(1)
    return a


x = foo()
print(x)

y = foo()
print(y)

z = foo()
print(z)

x is y  # False, they're different lists, like we wanted
y is z  # False, they're different lists, like we wanted
$ python3 default_good.py
[1]
[1]
[1]
def foo(a="hello!"):
    return a

Python VS JavaScript

hashtag
Contents

  • Versions

  • Development Environments

  • Running Programs

  • Comments

  • Semicolons

  • Whitespace, Blocks

  • Functions

  • Arithmetic Operators

  • Variables

  • Data Types

  • Arrays/Lists

  • Slices

  • Objects/Dicts

  • String Formatting

  • Booleans and Conditionals

  • for Loops

  • while Loops

  • switch Statement

  • if Conditionals

  • Classes

hashtag
Versions

hashtag
JavaScript

The standard defining JavaScript (JS) is ECMAScript (ES). Modern browsers and NodeJS support ES6, which has a rich feature set. Older browsers might not support all ES6 features.

The website will show which browsers support specific JS features.

hashtag
Python

Python 3.x is the current version, but there are a number of packages and sites running legacy Python 2.

On some systems, you might have to be explicit when you invoke Python about which version you want by running python2 or python3. The --version command line switch will tell you which version is running. Example:

Using virtualenv or pipenv can really ease development painpoints surrounding the version. See Development Environments, below.

hashtag
Development Environments

hashtag
JavaScript

For managing project packages, the classic tool is npm. This is slowly being superseded by the newer yarn tool. Choose one for a project, and don't mix and match.

hashtag
Python

For managing project packages and Python versions, the classic tool is virtualenv. This is slowly being superseded by the newer pipenv tool.

hashtag
Running Programs

hashtag
JavaScript

Running from the command line with NodeJS:

In a web page, a script is referenced with a <script> HTML tag:

hashtag
Python

Running from the command line:

hashtag
Comments

hashtag
JavaScript

Single line:

Multi-line comments:

You may not nest multi-line comments.

hashtag
Python

Single line:

Python doesn't directly support multi-line comments, but you can effectively do them by using multi-line strings """:

hashtag
Semicolons

hashtag
JavaScript

Javascript ends statements with semicolons, usually at the end of the line. I can also be effectively used to put multiple statements on the same line, but this is rare.

Javascript interpreters will let you get away without using semicolons at ends of lines, but you should use them.

hashtag
Python

Python can separate statements by semicolons, though this is rare in practice.

hashtag
Whitespace, blocks

hashtag
JavaScript

Whitespace has no special meaning. Blocks are declared with squirrely braces { and }.

hashtag
Python

Indentation level is how blocks are declared. The preferred method is to use spaces, but tabs can also be used.

hashtag
Functions

hashtag
JavaScript

Define functions as follows:

An alternate syntax for functions is growing increasingly common, called arrow functions:

hashtag
Python

Define functions as follows:

Python also supports the concept of lambda functions, which are simple functions that can do basic operations.

hashtag
Arithmetic Operators

hashtag
JavaScript

hashtag
Python

The pre- and post-increment and decrement are notably absent.

hashtag
Variables

hashtag
Javascript

Variables are created upon use, but should be created with the let or const keywords.

var is an outdated way of declaring variables in Javascript.

hashtag
Python

Variables are created upon use.

hashtag
Data Types

hashtag
JavaScript

Multi-line strings:

Parameterized strings:

JS is weakly typed so it supports operations on multiple types of data at once.

hashtag
Python

Multi-line strings:

Parameterized strings:

Python is generally strongly typed so it it will often complain if you try to mix and match types. You can coerce a type with the int(), float(), str(), and bool() functions.

hashtag
Arrays/Lists

hashtag
JavaScript

In JS, lists are called arrays.

Arrays are zero-based.

Creating lists:

Accessing:

Length/number of elements:

hashtag
Python

In Python, arrays are called lists.

Lists are zero-based.

Creating lists:

Accessing:

Length/Number of elements:

Slices

In Python, we can access parts of lists or strings using slices.

Creating slices:

Starting from the end: We can also use negative numbers when creating slices, which just means we start with the index at the end of the array, rather than the index at the beginning of the array.

Tuples

Python supports a read-only type of list called a tuple.

List Comprehensions

Python supports building lists with list comprehensions. This is often useful for filtering lists.

hashtag
Objects/Dicts

hashtag
JavaScript

Objects hold data which can be found by a specific key called a property.

Creation:

Access:

hashtag
Python

Dicts hold information that can be accessed by a key.

Unlike objects in JS, a dict is its own beast, and is not the same as an object obtained by instantiating a Python class.

Creation:

Access:

Dot notation does not work with Python dicts.

hashtag
String Formatting

hashtag
JavaScript

Converting to different number bases:

Controlling floating point precision:

Padding and justification:

Parameterized strings:

hashtag
Python

Python has the printf operator % which is tremendously powerful. (If the operands to % are numbers, modulo is performed. If the left operand is a string, printf is performed.)

But even % is being superseded by the format function.

.

Also see for a reference.

hashtag
Booleans and Conditionals

hashtag
JavaScript

Literal boolean values:

Boolean operators:

The concept of strict equality/inequality applies to items that might normally be converted into a compatible type. The strict tests will consider if the types themselves are the same.

Logical operators:

The not operator ! can be used to test whether or not a value is "truthy".

Example:

hashtag
Python

Literal boolean values:

Boolean operators:

Logical operators:

The not operator can be used to test whether or not a value is "truthy".

Example:

hashtag
for Loops

hashtag
JavaScript

C-style for loops:

for-in loops iterate over the properties of an object or indexes of an array:

for-of loops access the values within the array (as opposed to the indexes of the array):

hashtag
Python

for-in loops over an iteratable. This can be a list, object, or other type of iterable item.

Counting loops:

Iterating over other types:

hashtag
while Loops

hashtag
JavaScript

C-style while and do-while:

hashtag
Python

Python has a while loop:

hashtag
switch Statement

hashtag
JavaScript

JS can switch on various data types:

hashtag
Python

Python doesn't have a switch statement. You can use if-elif-else blocks.

A somewhat clumsy approximation of a switch can be constructed with a dict of functions.

hashtag
if Conditionals

hashtag
JavaScript

JS uses C-style if statements:

hashtag
Python

Python notably uses elif instead of else if.

hashtag
Classes

hashtag
JavaScript

The current object is referred to by this.

Pre ES-2015, classes were created using functions. This is now outdated.

JS uses prototypal inheritance. Pre ES-2015, this was explicit, and is also outdated:

Modern JS introduced the class keyword and a syntax more familiar to most other OOP languages. Note that the inheritance model is still prototypal inheritance; it's just that the details are hidden from the developer.

JS does not support multiple inheritance since each object can only have one prototype object. You have to use a mix-in if you want to achieve similar functionality.

hashtag
Python

The current object is referred to by self. Note that self is explicitly present as the first parameter in object methods.

Python 2 syntax:

Python 3 syntax includes the new super() keyword to make life easier.

Python supports multiple inheritance.

Pre-decrement, post-decrement

++

Pre-increment, post-increment

**

Exponentiation (power)

=

Assignment

+=

Addition assignment

-=

Subtraction assignment

*=

Multiplication assignment

/=

Division assignment

%=

Modulo assignment

Exponentiation (power)

=

Assignment

+=

Addition assignment

-=

Subtraction assignment

*=

Multiplication assignment

/=

Division assignment

%=

Modulo assignment

Greater than

<=

Less than or equal

>=

Greater than or equal

`

Logical OR

Greater than or equal

Operator

Description

+

Addition

-

Subtraction

*

Multiplication

/

Division

%

Modulo (remainder)

Operator

Description

+

Addition

-

Subtraction

*

Multiplication

/

Division

%

Modulo (remainder)

Operator

Definition

==

Equality

!=

Inequality

===

Strict equality

!==

Strict inequality

<

Less than

Operator

Description

!

Logical inverse, not

&&

Logical AND

`

Operator

Definition

==

Equality

!=

Inequality

<

Less than

>

Greater than

<=

Less than or equal

Operator

Description

not

Logical inverse, not

and

Logical AND

or

Logical OR

caniuse.comarrow-up-right
Tons of details at pyformat.infoarrow-up-right
printf-style String Formattingarrow-up-right

--

**

>

>=

$ python --version
Python 2.7.10
$ python2 --version
-bash: python2: command not found
$ python3 --version
Python 3.6.5
node program.js arg1 arg2 etc
<script src="program.js"></script>
python program.py arg1 arg2 etc
// Anything after two forward slashes is a comment
print(2);  // prints 2
/* Anything between slash-star and
star-slash is a comment */
# Anything after a # is a comment
print(2)  # prints 2
"""
At this point we wish
to print out some numbers
and see where that gets us
"""
print(1)
print(2)
console.log("Hello, world!");

let x = 10; console.log(x);
print(1); print(2)   # prints 1, then 2
if (x == 2) {
  console.log("x must be 2")
} else {
  if (x == 3) {
    console.log("x must be 3")
  } else {
    console.log("x must be something else")
  }
}
if x == 2:
  print("x must be 2")
else:
  if x == 3:
    print("x must be 3")
  else:
    print("x must be something else")
function foobar(x, y, z) {
  console.log(x, y, z);
  return 12;
}
let hello = () => {
  console.log("hello");
  console.log("world");
}

hello(); // prints hello, then world

// Arrow functions with single parameters don't
// need parens around the parameter:
let printNum = x => {
  console.log(x);
}

// If you don't explicitly return a value, the value
// of the last expression in the function is used.
// Also, single-expression functions don't need
// braces around them.
let add = (x, y) => x + y;

console.log(add(4, 5)); // prints 9
def foobar(x, y, z):
  print(x, y, z)
  return 12
add = lambda x, y: x + y

print(add(4, 5)) # prints 9
let x = 10;
const y = 30;
x = 10
let a = 12;        // number
let b = 1.2;       // number
let c = 'hello';   // string
let d = "world";   // string 
let e = true;      // boolean
let f = null;      // null value
let g = undefined; // undefined value
let s = `this is a
multi-line string`;
let x = 12;
console.log(`x is ${x}`); // prints "x is 12"
"2" + 4;           // string "24"
parseInt("2") + 4; // number 6
Number("2") + 4;   // number 6
a = 12       # int (integer)
b = 1.2      # float (floating point)
c = 'hello'  # str (string)
d = "world"  # str
e = False    # bool (boolean)
f = None     # null value
s = """this is a
multi-line string"""
x = 12
print(f'x is {x}')   # prints "x is 12"
"2" + 4        # ERROR: can't mix types
int("2") + 4   # integer 6
"2" + str(4)   # string 24
let a1 = new Array();   // Empty array
let a2 = new Array(10); // Array of 10 elements
let a3 = [];            // Empty array
let a4 = [10, 20, 30];  // Array of 3 elements
let a5 = [1, 2, "b"];   // No problem
console.log(a4[1]);  // prints 20

a4[0] = 5;   // change from 10 to 5
a4[20] = 99; // OK, makes a new element at index 20
a4.length; // 3
a1 = list()          # Empty list
a2 = list((88, 99))  # List of two elements
a3 = []              # Empty list
a4 = [10, 20, 30]    # List of 3 elements
a5 = [1, 2, "b"]     # No problem
print(a4[1])  # prints 20

a4[0] = 5;    # change from 10 to 5
a4[20] = 99;  # ERROR: assignment out of range
len(a4)   # 3
a[start:end] # items start through end-1
a[start:]    # items start through the rest of the array
a[:end]      # items from the beginning through end-1
a[:]         # a copy of the whole array
a[-1]    # last item in the array
a[-2:]   # last two items in the array
a[:-2]   # everything except the last two items
x = (1, 2, 3)
print(x[1])  # prints 2

y = (10,)    # A tuple of one element, comma required
a = [1, 2, 3, 4, 5]

# Make a list b that is the same as list a:
b = [i for i in a]  # Pretty boring

# Make a list c that contains only the
# even elements of a:
c = [i for i in a if i % 2 == 0]
let o1 = {};           // empty object
let o2 = {"x": 12};    // one property
let o3 = {y: "hello"}; // property quotes optional

let o4 = {  // common multiline format
  "a": 20,
  "b": 1.2,
  "foo": "hello"
};
console.log(o2.x);      // prints 12
console.log(o4["foo"]); // prints hello
o1 = {}           # empty dict
o2 = {"x": 12}    # one key
o3 = {y: "hello"} # ERROR: key quotes required,
                  # unless y is a variable
                  # that holds a value you wish
                  # to use as a key

o4 = {  # multiline format
  "a": 20,
  "b": 1.2,
  "foo": "hello"
}
print(o4["a"])  # Prints 20
let x = 237;
let x_binary = x.toString(2); // string '11101101'
let x_hex = x.toString(16);   // string 'ed'
let x = 3.1415926535;
let y = x.toFixed(2);  // string '3.14'
let s = "Hello!";
let t = s.padStart(10, ' '); // string '    Hello!' 
let u = s.padEnd(10, ' ');   // string 'Hello!    '

let v = s.padStart(10, '*'); // string '****Hello!' 

// Pad with leading zeroes
(12).toString(2).padStart(8, '0'); // string '00001100'
let x = 3.1415926;
let y = "Hello";
let z = 67;

// 'x is 3.14, y is "Hello", z is 01000011'
let s = `x is ${x.toFixed(2)}, y is "${y}", z is ${z.toString(2).padStart(8, '0')}`
x = true;
y = false;
0 == "0";  // true
0 === "0"; // false

0 == [];   // true
0 === [];  // false

0 == 0;    // true
0 === 0;   // true
!0;    // true
!!0;   // false
!1;    // false
!null; // true
!"0";  // false, perhaps unexpectedly
!"x";  // false
if (a == 2 && b !== "") {
  // Something complicated
}
x = True
y = False
not 0      # true
not not 0  # false
not 1      # false
not None;  # true
not "0"    # false, perhaps unexpectedly
not "x"    # false
if a == 2 and b != "":
  # Something complicated
for (let i = 0; i < 10; i++) {
  console.log(i);
}
a = [10, 20, 30];

for (let i in a) {
  console.log(i);    # 0  1  2
  console.log(a[i]); # 10 20 30
}

b = {'x': 77, 'y': 88, 'z': 99};

for (let i in b) {
  console.log(i);    # x  y  z
  console.log(b[i]); # 77 88 99
}
a = [10, 20, 30];

for (let i of a) {
  console.log(i);  # 10 20 30
}
# Use the range() function to count:
for i in range(10):
  print(i)   # Prints 0-9

for i in range(20, 30):
  print(i)   # Prints 20-29

for i in range(-10, 20, 3):
  print(i)   # Print every 3rd number from -10 to 19
# A list
a = [10, 20, 30]

# Print 10 20 30
for i in a:
  print(i)

# A dict
b = {'x':5, 'y':15, 'z':0}

# Print x y z (the keys of the dict)
for i in b:
  print(i)
// Print 10 down to 0:

let x = 10;
while (x >= 0) {
  console.log(x);
  x--;
}

// Print 0 up to 9:
let x = 0;
do {
  console.log(x);
  x++;
while (x < 10);
# Print from 10 down through 0
x = 10
while x >= 0:
  print(x)
  x -= 1
switch(x) {
  case "foo":
    console.log("x is foo, all right");
    break;
  case 23:
    console.log("but here x is 23");
    break;
  default:
    console.log("x is something else entirely");
}
def func1():
  print("case 1 is hit")

def func2():
  print("case 2 is hit")

def func3():
  print("case 3 is hit")

funcs = {
  "alpha": func1,
  "bravo": func2,
  "charlie": func3
};

x = "bravo"
funcs[x]()  # calls func2
if (x == 10) {
  console.log("x is 10");
} else if (x == 20) {
  console.log("x is 20");
} else {
  console.log("x is something else");
}
if x == 10:
  print("x is 10")
elif x == 20:
  print("x is 20")
else:
  print("x is something else")
function Goat(color) {
  this.legs = 4;
  this.color = color;
}

g = new Goat("brown");
function Creature(type) {
  this.type = type;
}

// Make Goats inherit from Creature:
Goat.prototype = new Creature("mammal");

// Add a method:
Goat.prototype.jump = function () {
  console.log("I'm jumping! Yay!");
};

g = new Goat("red");
g.type;   // "mammal", since Goat inherits from Creature
g.jump(); // "I'm jumping! Yay!"
class Creature {
  constructor(type) {
    this.type = type;
  }
}

class Goat extends Creature {
  constructor(color) {
    super("mammal");
    this.legs = 4;
    this.color = color;
  }

  jump() {
    console.log("I'm jumping! Yay!");
  }
}

g = new Goat("orange");
g.type;   // "mammal"
g.jump(); // "I'm jumping! Yay!"
class Creature:
  def __init__(self, type): # constructor
    self.type = type

class Goat(Creature):
  def __init__(self, color):
    # call super constructor
    Creature.__init__(self, "mammal")
    self.color = color

  def jump(self):
    print("I'm jumping! Yay!")

g = Goat("green")
g.type    # mammal
g.jump()  # I'm jumping! Yay!
class Creature:
  def __init__(self, type): # constructor
    self.type = type

class Goat(Creature):
  def __init__(self, color):
    # call super constructor
    super().__init__("mammal")  # <-- Nicer!
    self.color = color

  def jump(self):
    print("I'm jumping! Yay!")

g = Goat("green")
g.type    # mammal
g.jump()  # I'm jumping! Yay!

Python Modules & Python Packages

the difference

This article explores Python modules and Python packages, two mechanisms that facilitate modular programming.

Modular programming refers to the process of breaking a large, unwieldy programming task into separate, smaller, more manageable subtasks or modules. Individual modules can then be cobbled together like building blocks to create a larger application.

There are several advantages to modularizing code in a large application:

  • Simplicity: Rather than focusing on the entire problem at hand, a module typically focuses on one relatively small portion of the problem. If you’re working on a single module, you’ll have a smaller problem domain to wrap your head around. This makes development easier and less error-prone.

  • Maintainability: Modules are typically designed so that they enforce logical boundaries between different problem domains. If modules are written in a way that minimizes interdependency, there is decreased likelihood that modifications to a single module will have an impact on other parts of the program. (You may even be able to make changes to a module without having any knowledge of the application outside that module.) This makes it more viable for a team of many programmers to work collaboratively on a large application.

  • Reusability: Functionality defined in a single module can be easily reused (through an appropriately defined interface) by other parts of the application. This eliminates the need to duplicate code.

  • Scoping: Modules typically define a separate , which helps avoid collisions between identifiers in different areas of a program. (One of the tenets in the is Namespaces are one honking great idea—let’s do more of those!)

Functions, modules and packages are all constructs in Python that promote code modularization.

Free PDF Download:

hashtag
Python Modules: Overview

There are actually three different ways to define a module in Python:

  1. A module can be written in Python itself.

  2. A module can be written in C and loaded dynamically at run-time, like the re () module.

  3. A built-in module is intrinsically contained in the interpreter, like the .

A module’s contents are accessed the same way in all three cases: with the import statement.

Here, the focus will mostly be on modules that are written in Python. The cool thing about modules written in Python is that they are exceedingly straightforward to build. All you need to do is create a file that contains legitimate Python code and then give the file a name with a .py extension. That’s it! No special syntax or voodoo is necessary.

For example, suppose you have created a file called mod.py containing the following:

mod.py

Several objects are defined in mod.py:

  • s (a string)

  • a (a list)

  • foo() (a function)

Assuming mod.py is in an appropriate location, which you will learn more about shortly, these objects can be accessed by importing the module as follows:>>>

hashtag
The Module Search Path

Continuing with the above example, let’s take a look at what happens when Python executes the statement:

When the interpreter executes the above import statement, it searches for mod.py in a of directories assembled from the following sources:

  • The directory from which the input script was run or the current directory if the interpreter is being run interactively

  • The list of directories contained in the environment variable, if it is set. (The format for PYTHONPATH is OS-dependent but should mimic the PATH environment variable.)

The resulting search path is accessible in the Python variable sys.path, which is obtained from a module named sys:>>>

Note: The exact contents of sys.path are installation-dependent. The above will almost certainly look slightly different on your computer.

Thus, to ensure your module is found, you need to do one of the following:

  • Put mod.py in the directory where the input script is located or the current directory, if interactive

  • Modify the PYTHONPATH environment variable to contain the directory where mod.py is located before starting the interpreter

There is actually one additional option: you can put the module file in any directory of your choice and then modify sys.path at run-time so that it contains that directory. For example, in this case, you could put mod.py in directory C:\Users\john and then issue the following statements:>>>

Once a module has been imported, you can determine the location where it was found with the module’s __file__ attribute:>>>

The directory portion of __file__ should be one of the directories in sys.path.

hashtag
The import Statement

Module contents are made available to the caller with the import statement. The import statement takes many different forms, shown below.

hashtag
import <module_name>

The simplest form is the one already shown above:

Note that this does not make the module contents directly accessible to the caller. Each module has its own private symbol table, which serves as the global symbol table for all objects defined in the module. Thus, a module creates a separate namespace, as already noted.

The statement import <module_name> only places <module_name> in the caller’s symbol table. The objects that are defined in the module remain in the module’s private symbol table.

From the caller, objects in the module are only accessible when prefixed with <module_name> via dot notation, as illustrated below.

After the following import statement, mod is placed into the local symbol table. Thus, mod has meaning in the caller’s local context:>>>

But s and foo remain in the module’s private symbol table and are not meaningful in the local context:>>>

To be accessed in the local context, names of objects defined in the module must be prefixed by mod:>>>

Several comma-separated modules may be specified in a single import statement:

hashtag
from <module_name> import <name(s)>

An alternate form of the import statement allows individual objects from the module to be imported directly into the caller’s symbol table:

Following execution of the above statement, <name(s)> can be referenced in the caller’s environment without the <module_name> prefix:>>>

Because this form of import places the object names directly into the caller’s symbol table, any objects that already exist with the same name will be overwritten:>>>

It is even possible to indiscriminately import everything from a module at one fell swoop:

This will place the names of all objects from <module_name> into the local symbol table, with the exception of any that begin with the underscore (_) character.

For example:>>>

This isn’t necessarily recommended in large-scale production code. It’s a bit dangerous because you are entering names into the local symbol table en masse. Unless you know them all well and can be confident there won’t be a conflict, you have a decent chance of overwriting an existing name inadvertently. However, this syntax is quite handy when you are just mucking around with the interactive interpreter, for testing or discovery purposes, because it quickly gives you access to everything a module has to offer without a lot of typing.

hashtag
from <module_name> import <name> as <alt_name>

It is also possible to import individual objects but enter them into the local symbol table with alternate names:

This makes it possible to place names directly into the local symbol table but avoid conflicts with previously existing names:>>>

hashtag
import <module_name> as <alt_name>

You can also import an entire module under an alternate name:

>>>

Module contents can be imported from within a . In that case, the import does not occur until the function is called:>>>

However, Python 3 does not allow the indiscriminate import * syntax from within a function:>>>

Lastly, a clause can be used to guard against unsuccessful import attempts:>>>

>>>

hashtag
The dir() Function

The built-in function dir() returns a list of defined names in a namespace. Without arguments, it produces an alphabetically sorted list of names in the current local symbol table:>>>

Note how the first call to dir() above lists several names that are automatically defined and already in the namespace when the interpreter starts. As new names are defined (qux, Bar, x), they appear on subsequent invocations of dir().

This can be useful for identifying what exactly has been added to the namespace by an import statement:>>>

When given an argument that is the name of a module, dir() lists the names defined in the module:>>>

>>>

hashtag
Executing a Module as a Script

Any .py file that contains a module is essentially also a Python script, and there isn’t any reason it can’t be executed like one.

Here again is mod.py as it was defined above:

mod.py

This can be run as a script:

There are no errors, so it apparently worked. Granted, it’s not very interesting. As it is written, it only defines objects. It doesn’t do anything with them, and it doesn’t generate any output.

Let’s modify the above Python module so it does generate some output when run as a script:

mod.py

Now it should be a little more interesting:

Unfortunately, now it also generates output when imported as a module:>>>

This is probably not what you want. It isn’t usual for a module to generate output when it is imported.

Wouldn’t it be nice if you could distinguish between when the file is loaded as a module and when it is run as a standalone script?

Ask and ye shall receive.

When a .py file is imported as a module, Python sets the special dunder variable to the name of the module. However, if a file is run as a standalone script, __name__ is (creatively) set to the string '__main__'. Using this fact, you can discern which is the case at run-time and alter behavior accordingly:

mod.py

Now, if you run as a script, you get output:

But if you import as a module, you don’t:>>>

Modules are often designed with the capability to run as a standalone script for purposes of testing the functionality that is contained within the module. This is referred to as . For example, suppose you have created a module fact.py containing a factorial function, as follows:

fact.py

The file can be treated as a module, and the fact() function imported:>>>

But it can also be run as a standalone by passing an integer argument on the command-line for testing:

hashtag
Reloading a Module

For reasons of efficiency, a module is only loaded once per interpreter session. That is fine for function and class definitions, which typically make up the bulk of a module’s contents. But a module can contain executable statements as well, usually for initialization. Be aware that these statements will only be executed the first time a module is imported.

Consider the following file mod.py:

mod.py

>>>

The print() statement is not executed on subsequent imports. (For that matter, neither is the assignment statement, but as the final display of the value of mod.a shows, that doesn’t matter. Once the assignment is made, it sticks.)

If you make a change to a module and need to reload it, you need to either restart the interpreter or use a function called reload() from module importlib:>>>

hashtag
Python Packages

Suppose you have developed a very large application that includes many modules. As the number of modules grows, it becomes difficult to keep track of them all if they are dumped into one location. This is particularly so if they have similar names or functionality. You might wish for a means of grouping and organizing them.

Packages allow for a hierarchical structuring of the module namespace using dot notation. In the same way that modules help avoid collisions between global variable names, packages help avoid collisions between module names.

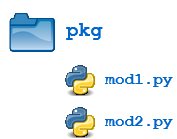
Creating a package is quite straightforward, since it makes use of the operating system’s inherent hierarchical file structure. Consider the following arrangement:

Here, there is a directory named pkg that contains two modules, mod1.py and mod2.py. The contents of the modules are:

mod1.py

mod2.py

Given this structure, if the pkg directory resides in a location where it can be found (in one of the directories contained in sys.path), you can refer to the two modules with dot notation (pkg.mod1, pkg.mod2) and import them with the syntax you are already familiar with:

>>>

>>>

>>>

You can import modules with these statements as well:

>>>

You can technically import the package as well:>>>

But this is of little avail. Though this is, strictly speaking, a syntactically correct Python statement, it doesn’t do much of anything useful. In particular, it does not place any of the modules in pkg into the local namespace:>>>

To actually import the modules or their contents, you need to use one of the forms shown above.

hashtag
Package Initialization

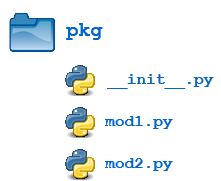
If a file named __init__.py is present in a package directory, it is invoked when the package or a module in the package is imported. This can be used for execution of package initialization code, such as initialization of package-level data.

For example, consider the following __init__.py file:

__init__.py

Let’s add this file to the pkg directory from the above example:

Now when the package is imported, the global list A is initialized:>>>

A module in the package can access the global variable by importing it in turn:

mod1.py

>>>

__init__.py can also be used to effect automatic importing of modules from a package. For example, earlier you saw that the statement import pkg only places the name pkg in the caller’s local symbol table and doesn’t import any modules. But if __init__.py in the pkg directory contains the following:

__init__.py

then when you execute import pkg, modules mod1 and mod2 are imported automatically:>>>

Note: Much of the Python documentation states that an __init__.py file must be present in the package directory when creating a package. This was once true. It used to be that the very presence of __init__.py signified to Python that a package was being defined. The file could contain initialization code or even be empty, but it had to be present.

Starting with Python 3.3, were introduced. These allow for the creation of a package without any __init__.py file. Of course, it can still be present if package initialization is needed. But it is no longer required.

hashtag
Importing * From a Package

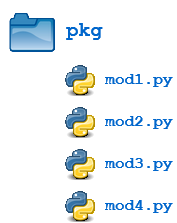
For the purposes of the following discussion, the previously defined package is expanded to contain some additional modules:

There are now four modules defined in the pkg directory. Their contents are as shown below:

mod1.py

mod2.py

mod3.py

mod4.py

(Imaginative, aren’t they?)

You have already seen that when import * is used for a module, all objects from the module are imported into the local symbol table, except those whose names begin with an underscore, as always:>>>

The analogous statement for a package is this:

What does that do?>>>

Hmph. Not much. You might have expected (assuming you had any expectations at all) that Python would dive down into the package directory, find all the modules it could, and import them all. But as you can see, by default that is not what happens.

Instead, Python follows this convention: if the __init__.py file in the package directory contains a list named __all__, it is taken to be a list of modules that should be imported when the statement from <package_name> import * is encountered.

For the present example, suppose you create an __init__.py in the pkg directory like this:

pkg/__init__.py

Now from pkg import * imports all four modules:>>>

Using import * still isn’t considered terrific form, any more for packages than for modules. But this facility at least gives the creator of the package some control over what happens when import * is specified. (In fact, it provides the capability to disallow it entirely, simply by declining to define __all__ at all. As you have seen, the default behavior for packages is to import nothing.)

By the way, __all__ can be defined in a module as well and serves the same purpose: to control what is imported with import *. For example, modify mod1.py as follows:

pkg/mod1.py

Now an import * statement from pkg.mod1 will only import what is contained in __all__:>>>

foo() (the function) is now defined in the local namespace, but Foo (the class) is not, because the latter is not in __all__.

In summary, __all__ is used by both packages and modules to control what is imported when import * is specified. But the default behavior differs:

  • For a package, when __all__ is not defined, import * does not import anything.

  • For a module, when __all__ is not defined, import * imports everything (except—you guessed it—names starting with an underscore).

hashtag
Subpackages

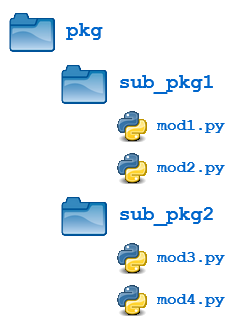
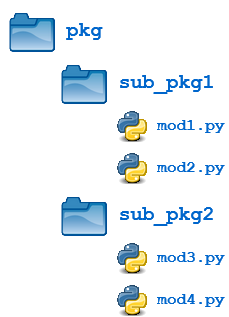
Packages can contain nested subpackages to arbitrary depth. For example, let’s make one more modification to the example package directory as follows:

The four modules (mod1.py, mod2.py, mod3.py and mod4.py) are defined as previously. But now, instead of being lumped together into the pkg directory, they are split out into two subpackage directories, sub_pkg1 and sub_pkg2.

Importing still works the same as shown previously. Syntax is similar, but additional dot notation is used to separate package name from subpackage name:>>>

In addition, a module in one subpackage can reference objects in a sibling subpackage (in the event that the sibling contains some functionality that you need). For example, suppose you want to import and execute function foo() (defined in module mod1) from within module mod3. You can either use an absolute import:

pkg/sub__pkg2/mod3.py

>>>

Or you can use a relative import, where .. refers to the package one level up. From within mod3.py, which is in subpackage sub_pkg2,

  • .. evaluates to the parent package (pkg), and

  • ..sub_pkg1 evaluates to subpackage sub_pkg1 of the parent package.

pkg/sub__pkg2/mod3.py

>>>

hashtag
Conclusion

In this tutorial, you covered the following topics:

  • How to create a Python module

  • Locations where the Python interpreter searches for a module

  • How to obtain access to the objects defined in a module with the import statement

Free PDF Download:

This will hopefully allow you to better understand how to gain access to the functionality available in the many third-party and built-in modules available in Python.

Additionally, if you are developing your own application, creating your own modules and packages will help you organize and modularize your code, which makes coding, maintenance, and debugging easier.

If you want to learn more, check out the following documentation at Python.org:

hashtag
— Top-level script environment

'__main__' is the name of the scope in which top-level code executes. A module’s __name__ is set equal to '__main__' when read from standard input, a script, or from an interactive prompt.

A module can discover whether or not it is running in the main scope by checking its own __name__, which allows a common idiom for conditionally executing code in a module when it is run as a script or with python -m but not when it is imported:

For a package, the same effect can be achieved by including a __main__.py module, the contents of which will be executed when the module is run

hashtag
. The import system

Python code in one gains access to the code in another module by the process of it. The statement is the most common way of invoking the import machinery, but it is not the only way. Functions such as and built-in can also be used to invoke the import machinery.

The statement combines two operations; it searches for the named module, then it binds the results of that search to a name in the local scope. The search operation of the import statement is defined as a call to the function, with the appropriate arguments. The return value of is used to perform the name binding operation of the import statement. See the import statement for the exact details of that name binding operation.

A direct call to performs only the module search and, if found, the module creation operation. While certain side-effects may occur, such as the importing of parent packages, and the updating of various caches (including ), only the statement performs a name binding operation.

When an statement is executed, the standard builtin function is called. Other mechanisms for invoking the import system (such as ) may choose to bypass and use their own solutions to implement import semantics.

When a module is first imported, Python searches for the module and if found, it creates a module object , initializing it. If the named module cannot be found, a is raised. Python implements various strategies to search for the named module when the import machinery is invoked. These strategies can be modified and extended by using various hooks described in the sections below.

Changed in version 3.3: The import system has been updated to fully implement the second phase of . There is no longer any implicit import machinery - the full import system is exposed through . In addition, native namespace package support has been implemented (see ).

hashtag
5.1.

The module provides a rich API for interacting with the import system. For example provides a recommended, simpler API than built-in for invoking the import machinery. Refer to the library documentation for additional detail.

hashtag
5.2. Packages

Python has only one type of module object, and all modules are of this type, regardless of whether the module is implemented in Python, C, or something else. To help organize modules and provide a naming hierarchy, Python has a concept of .

You can think of packages as the directories on a file system and modules as files within directories, but don’t take this analogy too literally since packages and modules need not originate from the file system. For the purposes of this documentation, we’ll use this convenient analogy of directories and files. Like file system directories, packages are organized hierarchically, and packages may themselves contain subpackages, as well as regular modules.

It’s important to keep in mind that all packages are modules, but not all modules are packages. Or put another way, packages are just a special kind of module. Specifically, any module that contains a __path__ attribute is considered a package.

All modules have a name. Subpackage names are separated from their parent package name by a dot, akin to Python’s standard attribute access syntax. Thus you might have a module called and a package called , which in turn has a subpackage called and a module within that subpackage called email.mime.text.

hashtag
5.2.1. Regular packages

Python defines two types of packages, and . Regular packages are traditional packages as they existed in Python 3.2 and earlier. A regular package is typically implemented as a directory containing an __init__.py file. When a regular package is imported, this __init__.py file is implicitly executed, and the objects it defines are bound to names in the package’s namespace. The __init__.py file can contain the same Python code that any other module can contain, and Python will add some additional attributes to the module when it is imported.

For example, the following file system layout defines a top level parent package with three subpackages:

Importing parent.one will implicitly execute parent/__init__.py and parent/one/__init__.py. Subsequent imports of parent.two or parent.three will execute parent/two/__init__.py and parent/three/__init__.py respectively.

hashtag
5.2.2. Namespace packages

A namespace package is a composite of various , where each portion contributes a subpackage to the parent package. Portions may reside in different locations on the file system. Portions may also be found in zip files, on the network, or anywhere else that Python searches during import. Namespace packages may or may not correspond directly to objects on the file system; they may be virtual modules that have no concrete representation.

Namespace packages do not use an ordinary list for their __path__ attribute. They instead use a custom iterable type which will automatically perform a new search for package portions on the next import attempt within that package if the path of their parent package (or for a top level package) changes.

With namespace packages, there is no parent/__init__.py file. In fact, there may be multiple parent directories found during import search, where each one is provided by a different portion. Thus parent/one may not be physically located next to parent/two. In this case, Python will create a namespace package for the top-level parent package whenever it or one of its subpackages is imported.

See also for the namespace package specification.

hashtag
5.3. Searching

To begin the search, Python needs the name of the module (or package, but for the purposes of this discussion, the difference is immaterial) being imported. This name may come from various arguments to the statement, or from the parameters to the or functions.

This name will be used in various phases of the import search, and it may be the dotted path to a submodule, e.g. foo.bar.baz. In this case, Python first tries to import foo, then foo.bar, and finally foo.bar.baz. If any of the intermediate imports fail, a is raised.

hashtag
5.3.1. The module cache

The first place checked during import search is . This mapping serves as a cache of all modules that have been previously imported, including the intermediate paths. So if foo.bar.baz was previously imported, will contain entries for foo, foo.bar, and foo.bar.baz. Each key will have as its value the corresponding module object.

During import, the module name is looked up in and if present, the associated value is the module satisfying the import, and the process completes. However, if the value is None, then a is raised. If the module name is missing, Python will continue searching for the module.

is writable. Deleting a key may not destroy the associated module (as other modules may hold references to it), but it will invalidate the cache entry for the named module, causing Python to search anew for the named module upon its next import. The key can also be assigned to None, forcing the next import of the module to result in a .

Beware though, as if you keep a reference to the module object, invalidate its cache entry in , and then re-import the named module, the two module objects will not be the same. By contrast, will reuse the same module object, and simply reinitialise the module contents by rerunning the module’s code.

hashtag
5.3.2. Finders and loaders

If the named module is not found in , then Python’s import protocol is invoked to find and load the module. This protocol consists of two conceptual objects, and . A finder’s job is to determine whether it can find the named module using whatever strategy it knows about. Objects that implement both of these interfaces are referred to as - they return themselves when they find that they can load the requested module.

Python includes a number of default finders and importers. The first one knows how to locate built-in modules, and the second knows how to locate frozen modules. A third default finder searches an for modules. The is a list of locations that may name file system paths or zip files. It can also be extended to search for any locatable resource, such as those identified by URLs.

The import machinery is extensible, so new finders can be added to extend the range and scope of module searching.

Finders do not actually load modules. If they can find the named module, they return a module spec, an encapsulation of the module’s import-related information, which the import machinery then uses when loading the module.

The following sections describe the protocol for finders and loaders in more detail, including how you can create and register new ones to extend the import machinery.

Changed in version 3.4: In previous versions of Python, finders returned directly, whereas now they return module specs which contain loaders. Loaders are still used during import but have fewer responsibilities.

hashtag
5.3.3. Import hooks

The import machinery is designed to be extensible; the primary mechanism for this are the import hooks. There are two types of import hooks: meta hooks and import path hooks.

Meta hooks are called at the start of import processing, before any other import processing has occurred, other than cache look up. This allows meta hooks to override processing, frozen modules, or even built-in modules. Meta hooks are registered by adding new finder objects to , as described below.

Import path hooks are called as part of (or package.__path__) processing, at the point where their associated path item is encountered. Import path hooks are registered by adding new callables to as described below.

hashtag
5.3.4. The meta path

When the named module is not found in , Python next searches , which contains a list of meta path finder objects. These finders are queried in order to see if they know how to handle the named module. Meta path finders must implement a method called which takes three arguments: a name, an import path, and (optionally) a target module. The meta path finder can use any strategy it wants to determine whether it can handle the named module or not.

If the meta path finder knows how to handle the named module, it returns a spec object. If it cannot handle the named module, it returns None. If processing reaches the end of its list without returning a spec, then a is raised. Any other exceptions raised are simply propagated up, aborting the import process.

The method of meta path finders is called with two or three arguments. The first is the fully qualified name of the module being imported, for example foo.bar.baz. The second argument is the path entries to use for the module search. For top-level modules, the second argument is None, but for submodules or subpackages, the second argument is the value of the parent package’s __path__ attribute. If the appropriate __path__ attribute cannot be accessed, a is raised. The third argument is an existing module object that will be the target of loading later. The import system passes in a target module only during reload.

The meta path may be traversed multiple times for a single import request. For example, assuming none of the modules involved has already been cached, importing foo.bar.baz will first perform a top level import, calling mpf.find_spec("foo", None, None) on each meta path finder (mpf). After foo has been imported, foo.bar will be imported by traversing the meta path a second time, calling mpf.find_spec("foo.bar", foo.__path__, None). Once foo.bar has been imported, the final traversal will call mpf.find_spec("foo.bar.baz", foo.bar.__path__, None).

Some meta path finders only support top level imports. These importers will always return None when anything other than None is passed as the second argument.

Python’s default has three meta path finders, one that knows how to import built-in modules, one that knows how to import frozen modules, and one that knows how to import modules from an (i.e. the ).

Changed in version 3.4: The method of meta path finders replaced , which is now deprecated. While it will continue to work without change, the import machinery will try it only if the finder does not implement find_spec().

hashtag
5.4. Loading

If and when a module spec is found, the import machinery will use it (and the loader it contains) when loading the module. Here is an approximation of what happens during the loading portion of import:

Note the following details:

  • If there is an existing module object with the given name in , import will have already returned it.

  • The module will exist in before the loader executes the module code. This is crucial because the module code may (directly or indirectly) import itself; adding it to beforehand prevents unbounded recursion in the worst case and multiple loading in the best.

Changed in version 3.4: The import system has taken over the boilerplate responsibilities of loaders. These were previously performed by the method.

hashtag
5.4.1. Loaders

Module loaders provide the critical function of loading: module execution. The import machinery calls the method with a single argument, the module object to execute. Any value returned from is ignored.

Loaders must satisfy the following requirements:

  • If the module is a Python module (as opposed to a built-in module or a dynamically loaded extension), the loader should execute the module’s code in the module’s global name space (module.__dict__).

  • If the loader cannot execute the module, it should raise an , although any other exception raised during will be propagated.

In many cases, the finder and loader can be the same object; in such cases the method would just return a spec with the loader set to self.

Module loaders may opt in to creating the module object during loading by implementing a method. It takes one argument, the module spec, and returns the new module object to use during loading. create_module() does not need to set any attributes on the module object. If the method returns None, the import machinery will create the new module itself.

New in version 3.4: The method of loaders.

Changed in version 3.4: The method was replaced by and the import machinery assumed all the boilerplate responsibilities of loading.

For compatibility with existing loaders, the import machinery will use the load_module() method of loaders if it exists and the loader does not also implement exec_module(). However, load_module() has been deprecated and loaders should implement exec_module() instead.

The load_module() method must implement all the boilerplate loading functionality described above in addition to executing the module. All the same constraints apply, with some additional clarification:

  • If there is an existing module object with the given name in , the loader must use that existing module. (Otherwise, will not work correctly.) If the named module does not exist in , the loader must create a new module object and add it to .

  • The module must exist in before the loader executes the module code, to prevent unbounded recursion or multiple loading.

Changed in version 3.5: A is raised when exec_module() is defined but create_module() is not.

Changed in version 3.6: An is raised when exec_module() is defined but create_module() is not.

hashtag
5.4.2. Submodules

When a submodule is loaded using any mechanism (e.g. importlib APIs, the import or import-from statements, or built-in __import__()) a binding is placed in the parent module’s namespace to the submodule object. For example, if package spam has a submodule foo, after importing spam.foo, spam will have an attribute foo which is bound to the submodule. Let’s say you have the following directory structure:

and spam/__init__.py has the following lines in it:

then executing the following puts a name binding to foo and bar in the spam module:>>>

Given Python’s familiar name binding rules this might seem surprising, but it’s actually a fundamental feature of the import system. The invariant holding is that if you have sys.modules['spam'] and sys.modules['spam.foo'] (as you would after the above import), the latter must appear as the foo attribute of the former.

hashtag
5.4.3. Module spec

The import machinery uses a variety of information about each module during import, especially before loading. Most of the information is common to all modules. The purpose of a module’s spec is to encapsulate this import-related information on a per-module basis.

Using a spec during import allows state to be transferred between import system components, e.g. between the finder that creates the module spec and the loader that executes it. Most importantly, it allows the import machinery to perform the boilerplate operations of loading, whereas without a module spec the loader had that responsibility.

The module’s spec is exposed as the __spec__ attribute on a module object. See for details on the contents of the module spec.

New in version 3.4.

hashtag
5.4.4. Import-related module attributes

The import machinery fills in these attributes on each module object during loading, based on the module’s spec, before the loader executes the module.__name__

The __name__ attribute must be set to the fully-qualified name of the module. This name is used to uniquely identify the module in the import system.__loader__

The __loader__ attribute must be set to the loader object that the import machinery used when loading the module. This is mostly for introspection, but can be used for additional loader-specific functionality, for example getting data associated with a loader.__package__

The module’s __package__ attribute must be set. Its value must be a string, but it can be the same value as its __name__. When the module is a package, its __package__ value should be set to its __name__. When the module is not a package, __package__ should be set to the empty string for top-level modules, or for submodules, to the parent package’s name. See for further details.

This attribute is used instead of __name__ to calculate explicit relative imports for main modules, as defined in . It is expected to have the same value as __spec__.parent.

Changed in version 3.6: The value of __package__ is expected to be the same as __spec__.parent.__spec__

The __spec__ attribute must be set to the module spec that was used when importing the module. Setting __spec__ appropriately applies equally to . The one exception is __main__, where __spec__ is .

When __package__ is not defined, __spec__.parent is used as a fallback.

New in version 3.4.

Changed in version 3.6: __spec__.parent is used as a fallback when __package__ is not defined.__path__

If the module is a package (either regular or namespace), the module object’s __path__ attribute must be set. The value must be iterable, but may be empty if __path__ has no further significance. If __path__ is not empty, it must produce strings when iterated over. More details on the semantics of __path__ are given .

Non-package modules should not have a __path__ attribute.__file____cached__

__file__ is optional. If set, this attribute’s value must be a string. The import system may opt to leave __file__ unset if it has no semantic meaning (e.g. a module loaded from a database).

If __file__ is set, it may also be appropriate to set the __cached__ attribute which is the path to any compiled version of the code (e.g. byte-compiled file). The file does not need to exist to set this attribute; the path can simply point to where the compiled file would exist (see ).

It is also appropriate to set __cached__ when __file__ is not set. However, that scenario is quite atypical. Ultimately, the loader is what makes use of __file__ and/or __cached__. So if a loader can load from a cached module but otherwise does not load from a file, that atypical scenario may be appropriate.

hashtag
5.4.5. module.__path__

By definition, if a module has a __path__ attribute, it is a package.

A package’s __path__ attribute is used during imports of its subpackages. Within the import machinery, it functions much the same as , i.e. providing a list of locations to search for modules during import. However, __path__ is typically much more constrained than .

__path__ must be an iterable of strings, but it may be empty. The same rules used for also apply to a package’s __path__, and (described below) are consulted when traversing a package’s __path__.

A package’s __init__.py file may set or alter the package’s __path__ attribute, and this was typically the way namespace packages were implemented prior to . With the adoption of , namespace packages no longer need to supply __init__.py files containing only __path__ manipulation code; the import machinery automatically sets __path__ correctly for the namespace package.

hashtag
5.4.6. Module reprs

By default, all modules have a usable repr, however depending on the attributes set above, and in the module’s spec, you can more explicitly control the repr of module objects.

If the module has a spec (__spec__), the import machinery will try to generate a repr from it. If that fails or there is no spec, the import system will craft a default repr using whatever information is available on the module. It will try to use the module.__name__, module.__file__, and module.__loader__ as input into the repr, with defaults for whatever information is missing.

Here are the exact rules used:

  • If the module has a __spec__ attribute, the information in the spec is used to generate the repr. The “name”, “loader”, “origin”, and “has_location” attributes are consulted.

  • If the module has a __file__ attribute, this is used as part of the module’s repr.

Changed in version 3.4: Use of has been deprecated and the module spec is now used by the import machinery to generate a module repr.

For backward compatibility with Python 3.3, the module repr will be generated by calling the loader’s method, if defined, before trying either approach described above. However, the method is deprecated.

hashtag
5.4.7. Cached bytecode invalidation

Before Python loads cached bytecode from a .pyc file, it checks whether the cache is up-to-date with the source .py file. By default, Python does this by storing the source’s last-modified timestamp and size in the cache file when writing it. At runtime, the import system then validates the cache file by checking the stored metadata in the cache file against the source’s metadata.

Python also supports “hash-based” cache files, which store a hash of the source file’s contents rather than its metadata. There are two variants of hash-based .pyc files: checked and unchecked. For checked hash-based .pyc files, Python validates the cache file by hashing the source file and comparing the resulting hash with the hash in the cache file. If a checked hash-based cache file is found to be invalid, Python regenerates it and writes a new checked hash-based cache file. For unchecked hash-based .pyc files, Python simply assumes the cache file is valid if it exists. Hash-based .pyc files validation behavior may be overridden with the flag.

Changed in version 3.7: Added hash-based .pyc files. Previously, Python only supported timestamp-based invalidation of bytecode caches.

hashtag
5.5. The Path Based Finder

As mentioned previously, Python comes with several default meta path finders. One of these, called the (), searches an , which contains a list of . Each path entry names a location to search for modules.

The path based finder itself doesn’t know how to import anything. Instead, it traverses the individual path entries, associating each of them with a path entry finder that knows how to handle that particular kind of path.

The default set of path entry finders implement all the semantics for finding modules on the file system, handling special file types such as Python source code (.py files), Python byte code (.pyc files) and shared libraries (e.g. .so files). When supported by the module in the standard library, the default path entry finders also handle loading all of these file types (other than shared libraries) from zipfiles.

Path entries need not be limited to file system locations. They can refer to URLs, database queries, or any other location that can be specified as a string.

The path based finder provides additional hooks and protocols so that you can extend and customize the types of searchable path entries. For example, if you wanted to support path entries as network URLs, you could write a hook that implements HTTP semantics to find modules on the web. This hook (a callable) would return a supporting the protocol described below, which was then used to get a loader for the module from the web.

A word of warning: this section and the previous both use the term finder, distinguishing between them by using the terms and . These two types of finders are very similar, support similar protocols, and function in similar ways during the import process, but it’s important to keep in mind that they are subtly different. In particular, meta path finders operate at the beginning of the import process, as keyed off the traversal.

By contrast, path entry finders are in a sense an implementation detail of the path based finder, and in fact, if the path based finder were to be removed from , none of the path entry finder semantics would be invoked.

hashtag
5.5.1. Path entry finders

The is responsible for finding and loading Python modules and packages whose location is specified with a string . Most path entries name locations in the file system, but they need not be limited to this.

As a meta path finder, the implements the protocol previously described, however it exposes additional hooks that can be used to customize how modules are found and loaded from the .

Three variables are used by the , , and . The __path__ attributes on package objects are also used. These provide additional ways that the import machinery can be customized.

contains a list of strings providing search locations for modules and packages. It is initialized from the PYTHONPATH environment variable and various other installation- and implementation-specific defaults. Entries in can name directories on the file system, zip files, and potentially other “locations” (see the module) that should be searched for modules, such as URLs, or database queries. Only strings and bytes should be present on ; all other data types are ignored. The encoding of bytes entries is determined by the individual .

The is a , so the import machinery begins the search by calling the path based finder’s method as described previously. When the path argument to is given, it will be a list of string paths to traverse - typically a package’s __path__ attribute for an import within that package. If the path argument is None, this indicates a top level import and is used.

The path based finder iterates over every entry in the search path, and for each of these, looks for an appropriate () for the path entry. Because this can be an expensive operation (e.g. there may be stat() call overheads for this search), the path based finder maintains a cache mapping path entries to path entry finders. This cache is maintained in (despite the name, this cache actually stores finder objects rather than being limited to objects). In this way, the expensive search for a particular location’s need only be done once. User code is free to remove cache entries from forcing the path based finder to perform the path entry search again .

If the path entry is not present in the cache, the path based finder iterates over every callable in . Each of the in this list is called with a single argument, the path entry to be searched. This callable may either return a that can handle the path entry, or it may raise . An is used by the path based finder to signal that the hook cannot find a for that . The exception is ignored and iteration continues. The hook should expect either a string or bytes object; the encoding of bytes objects is up to the hook (e.g. it may be a file system encoding, UTF-8, or something else), and if the hook cannot decode the argument, it should raise .

If iteration ends with no being returned, then the path based finder’s method will store None in (to indicate that there is no finder for this path entry) and return None, indicating that this could not find the module.

If a is returned by one of the callables on , then the following protocol is used to ask the finder for a module spec, which is then used when loading the module.

The current working directory – denoted by an empty string – is handled slightly differently from other entries on . First, if the current working directory is found to not exist, no value is stored in . Second, the value for the current working directory is looked up fresh for each module lookup. Third, the path used for and returned by will be the actual current working directory and not the empty string.

hashtag
5.5.2. Path entry finder protocol

In order to support imports of modules and initialized packages and also to contribute portions to namespace packages, path entry finders must implement the method.

takes two arguments: the fully qualified name of the module being imported, and the (optional) target module. find_spec() returns a fully populated spec for the module. This spec will always have “loader” set (with one exception).

To indicate to the import machinery that the spec represents a namespace , the path entry finder sets “submodule_search_locations” to a list containing the portion.

Changed in version 3.4: replaced and , both of which are now deprecated, but will be used if find_spec() is not defined.

Older path entry finders may implement one of these two deprecated methods instead of find_spec(). The methods are still respected for the sake of backward compatibility. However, if find_spec() is implemented on the path entry finder, the legacy methods are ignored.

takes one argument, the fully qualified name of the module being imported. find_loader() returns a 2-tuple where the first item is the loader and the second item is a namespace .

For backwards compatibility with other implementations of the import protocol, many path entry finders also support the same, traditional find_module() method that meta path finders support. However path entry finder find_module() methods are never called with a path argument (they are expected to record the appropriate path information from the initial call to the path hook).

The find_module() method on path entry finders is deprecated, as it does not allow the path entry finder to contribute portions to namespace packages. If both find_loader() and find_module() exist on a path entry finder, the import system will always call find_loader() in preference to find_module().

hashtag
5.6. Replacing the standard import system

The most reliable mechanism for replacing the entire import system is to delete the default contents of , replacing them entirely with a custom meta path hook.

If it is acceptable to only alter the behaviour of import statements without affecting other APIs that access the import system, then replacing the builtin function may be sufficient. This technique may also be employed at the module level to only alter the behaviour of import statements within that module.

To selectively prevent the import of some modules from a hook early on the meta path (rather than disabling the standard import system entirely), it is sufficient to raise directly from instead of returning None. The latter indicates that the meta path search should continue, while raising an exception terminates it immediately.

hashtag
5.7. Package Relative Imports

Relative imports use leading dots. A single leading dot indicates a relative import, starting with the current package. Two or more leading dots indicate a relative import to the parent(s) of the current package, one level per dot after the first. For example, given the following package layout:

In either subpackage1/moduleX.py or subpackage1/__init__.py, the following are valid relative imports:

Absolute imports may use either the import <> or from <> import <> syntax, but relative imports may only use the second form; the reason for this is that:

should expose XXX.YYY.ZZZ as a usable expression, but .moduleY is not a valid expression.

hashtag
5.8. Special considerations for __main__

The module is a special case relative to Python’s import system. As noted , the __main__ module is directly initialized at interpreter startup, much like and . However, unlike those two, it doesn’t strictly qualify as a built-in module. This is because the manner in which __main__ is initialized depends on the flags and other options with which the interpreter is invoked.

hashtag
5.8.1. __main__.__spec__

Depending on how is initialized, __main__.__spec__ gets set appropriately or to None.

When Python is started with the option, __spec__ is set to the module spec of the corresponding module or package. __spec__ is also populated when the __main__ module is loaded as part of executing a directory, zipfile or other entry.

In __main__.__spec__ is set to None, as the code used to populate the does not correspond directly with an importable module:

  • interactive prompt

  • option

  • running from stdin

Note that __main__.__spec__ is always None in the last case, even if the file could technically be imported directly as a module instead. Use the switch if valid module metadata is desired in .

Note also that even when __main__ corresponds with an importable module and __main__.__spec__ is set accordingly, they’re still considered distinct modules. This is due to the fact that blocks guarded by if __name__ == "__main__": checks only execute when the module is used to populate the __main__ namespace, and not during normal import.

Misc

Awesome Find:

SCRAP

"""

"""


def plus_one(digits):
    # Your code here
    new_string = ""
    for digit in digits:
        new_digit = str(digit)
        new_string += new_digit
    print(new_string)
    str_tonum = int(new_string)
    str_tonum = str_tonum + 1
    str_tonum = str(str_tonum)
    new_list = list(str_tonum)
    str_num = []
    for string in new_list:
        string = int(string)
        str_num.append(string)
    return str_num


print(plus_one([1, 3, 2]))
print(plus_one([3, 2, 1, 9]))
print(plus_one([9, 9, 9]))
# uper
# input an array of nums
# output an array of all the numbs togheter plus 1
# PLAN
# add numbs into a string
# make string into a number and add 1
# put it back into an array and return

Foo (a class)

An installation-dependent list of directories configured at the time Python is installed

Or: Put mod.py in one of the directories already contained in the PYTHONPATH variable

  • Put mod.py in one of the installation-dependent directories, which you may or may not have write-access to, depending on the OS

  • How to create a module that is executable as a standalone script

  • How to organize modules into packages and subpackages

  • How to control package initialization

  • If loading fails, the failing module – and only the failing module – gets removed from sys.modulesarrow-up-right. Any module already in the sys.modulesarrow-up-right cache, and any module that was successfully loaded as a side-effect, must remain in the cache. This contrasts with reloading where even the failing module is left in sys.modulesarrow-up-right.
  • After the module is created but before execution, the import machinery sets the import-related module attributes (“_init_module_attrs” in the pseudo-code example above), as summarized in a later sectionarrow-up-right.

  • Module execution is the key moment of loading in which the module’s namespace gets populated. Execution is entirely delegated to the loader, which gets to decide what gets populated and how.

  • The module created during loading and passed to exec_module() may not be the one returned at the end of import 2arrow-up-right.

  • If loading fails, the loader must remove any modules it has inserted into sys.modulesarrow-up-right, but it must remove only the failing module(s), and only if the loader itself has loaded the module(s) explicitly.
    If the module has no __file__ but does have a __loader__ that is not None, then the loader’s repr is used as part of the module’s repr.
  • Otherwise, just use the module’s __name__ in the repr.

  • running directly from a source or bytecode file
    namespacearrow-up-right
    Zen of Pythonarrow-up-right
    Python 3 Cheat Sheetarrow-up-right
    regular expressionarrow-up-right
    itertools modulearrow-up-right
    arrow-up-right
    Remove adsarrow-up-right
    listarrow-up-right
    PYTHONPATHarrow-up-right
    arrow-up-right
    Remove adsarrow-up-right
    function definitionarrow-up-right
    try statement with an except ImportErrorarrow-up-right
    arrow-up-right
    Remove adsarrow-up-right
    __name__arrow-up-right
    unit testingarrow-up-right
    arrow-up-right
    Remove adsarrow-up-right
    arrow-up-right
    arrow-up-right
    Remove adsarrow-up-right
    arrow-up-right
    Implicit Namespace Packagesarrow-up-right
    arrow-up-right
    arrow-up-right
    Remove adsarrow-up-right
    arrow-up-right
    Python 3 Cheat Sheetarrow-up-right
    __main__arrow-up-right
    modulearrow-up-right
    importingarrow-up-right
    importarrow-up-right
    importlib.import_module()arrow-up-right
    __import__()arrow-up-right
    importarrow-up-right
    __import__()arrow-up-right
    __import__()arrow-up-right
    __import__()arrow-up-right
    sys.modulesarrow-up-right
    importarrow-up-right
    importarrow-up-right
    __import__()arrow-up-right
    importlib.import_module()arrow-up-right
    __import__()arrow-up-right
    1arrow-up-right
    ModuleNotFoundErrorarrow-up-right
    PEP 302arrow-up-right
    sys.meta_patharrow-up-right
    PEP 420arrow-up-right
    importlibarrow-up-right
    importlibarrow-up-right
    importlib.import_module()arrow-up-right
    __import__()arrow-up-right
    importlibarrow-up-right
    packagesarrow-up-right
    sysarrow-up-right
    emailarrow-up-right
    email.mimearrow-up-right
    regular packagesarrow-up-right
    namespace packagesarrow-up-right
    portionsarrow-up-right
    sys.patharrow-up-right
    PEP 420arrow-up-right
    fully qualifiedarrow-up-right
    importarrow-up-right
    importlib.import_module()arrow-up-right
    __import__()arrow-up-right
    ModuleNotFoundErrorarrow-up-right
    sys.modulesarrow-up-right
    sys.modulesarrow-up-right
    sys.modulesarrow-up-right
    ModuleNotFoundErrorarrow-up-right
    sys.modulesarrow-up-right
    ModuleNotFoundErrorarrow-up-right
    sys.modulesarrow-up-right
    importlib.reload()arrow-up-right
    sys.modulesarrow-up-right
    findersarrow-up-right
    loadersarrow-up-right
    importersarrow-up-right
    import patharrow-up-right
    import patharrow-up-right
    loadersarrow-up-right
    sys.modulesarrow-up-right
    sys.patharrow-up-right
    sys.meta_patharrow-up-right
    sys.patharrow-up-right
    sys.path_hooksarrow-up-right
    sys.modulesarrow-up-right
    sys.meta_patharrow-up-right
    find_spec()arrow-up-right
    sys.meta_patharrow-up-right
    ModuleNotFoundErrorarrow-up-right
    find_spec()arrow-up-right
    ModuleNotFoundErrorarrow-up-right
    sys.meta_patharrow-up-right
    import patharrow-up-right
    path based finderarrow-up-right
    find_spec()arrow-up-right
    find_module()arrow-up-right
    sys.modulesarrow-up-right
    sys.modulesarrow-up-right
    sys.modulesarrow-up-right
    importlib.abc.Loader.load_module()arrow-up-right
    importlib.abc.Loader.exec_module()arrow-up-right
    exec_module()arrow-up-right
    ImportErrorarrow-up-right
    exec_module()arrow-up-right
    find_spec()arrow-up-right
    create_module()arrow-up-right
    create_module()arrow-up-right
    load_module()arrow-up-right
    exec_module()arrow-up-right
    sys.modulesarrow-up-right
    importlib.reload()arrow-up-right
    sys.modulesarrow-up-right
    sys.modulesarrow-up-right
    sys.modulesarrow-up-right
    DeprecationWarningarrow-up-right
    ImportErrorarrow-up-right
    ModuleSpecarrow-up-right
    PEP 366arrow-up-right
    PEP 366arrow-up-right
    modules initialized during interpreter startuparrow-up-right
    set to None in some casesarrow-up-right
    belowarrow-up-right
    PEP 3147arrow-up-right
    sys.patharrow-up-right
    sys.patharrow-up-right
    sys.patharrow-up-right
    sys.path_hooksarrow-up-right
    PEP 420arrow-up-right
    PEP 420arrow-up-right
    loader.module_repr()arrow-up-right
    module_repr()arrow-up-right
    --check-hash-based-pycsarrow-up-right
    path based finderarrow-up-right
    PathFinderarrow-up-right
    import patharrow-up-right
    path entriesarrow-up-right
    zipimportarrow-up-right
    path entry finderarrow-up-right
    meta path finderarrow-up-right
    path entry finderarrow-up-right
    sys.meta_patharrow-up-right
    sys.meta_patharrow-up-right
    path based finderarrow-up-right
    path entryarrow-up-right
    path based finderarrow-up-right
    find_spec()arrow-up-right
    import patharrow-up-right
    path based finderarrow-up-right
    sys.patharrow-up-right
    sys.path_hooksarrow-up-right
    sys.path_importer_cachearrow-up-right
    sys.patharrow-up-right
    sys.patharrow-up-right
    sitearrow-up-right
    sys.patharrow-up-right
    path entry findersarrow-up-right
    path based finderarrow-up-right
    meta path finderarrow-up-right
    import patharrow-up-right
    find_spec()arrow-up-right
    find_spec()arrow-up-right
    sys.patharrow-up-right
    path entry finderarrow-up-right
    PathEntryFinderarrow-up-right
    sys.path_importer_cachearrow-up-right
    importerarrow-up-right
    path entryarrow-up-right
    path entry finderarrow-up-right
    sys.path_importer_cachearrow-up-right
    3arrow-up-right
    sys.path_hooksarrow-up-right
    path entry hooksarrow-up-right
    path entry finderarrow-up-right
    ImportErrorarrow-up-right
    ImportErrorarrow-up-right
    path entry finderarrow-up-right
    path entryarrow-up-right
    import patharrow-up-right
    ImportErrorarrow-up-right
    sys.path_hooksarrow-up-right
    path entry finderarrow-up-right
    find_spec()arrow-up-right
    sys.path_importer_cachearrow-up-right
    meta path finderarrow-up-right
    path entry finderarrow-up-right
    path entry hookarrow-up-right
    sys.path_hooksarrow-up-right
    sys.patharrow-up-right
    sys.path_importer_cachearrow-up-right
    sys.path_importer_cachearrow-up-right
    importlib.machinery.PathFinder.find_spec()arrow-up-right
    find_spec()arrow-up-right
    find_spec()arrow-up-right
    portionarrow-up-right
    find_spec()arrow-up-right
    find_loader()arrow-up-right
    find_module()arrow-up-right
    find_loader()arrow-up-right
    portionarrow-up-right
    sys.meta_patharrow-up-right
    __import__()arrow-up-right
    ModuleNotFoundErrorarrow-up-right
    find_spec()arrow-up-right
    __main__arrow-up-right
    elsewherearrow-up-right
    sysarrow-up-right
    builtinsarrow-up-right
    __main__arrow-up-right
    -marrow-up-right
    sys.patharrow-up-right
    the remaining casesarrow-up-right
    __main__arrow-up-right
    -carrow-up-right
    -marrow-up-right
    __main__arrow-up-right

    https://codesandbox.io/s/ys5bqarrow-up-right

    Python syntax was made for readability, and easy editing. For example, the python language uses a : and indented code, while javascript and others generally use {} and indented code.

    Lets create a python 3arrow-up-right repl, and call it Hello World. Now you have a blank file called main.py. Now let us write our first line of code:

    About Python

    hashtag
    What is Python?

    Python in simple words is a High-Level Dynamic Programming Language which is interpreted. Guido van Rossum , the father of Python had simple goals in mind when he was developing it, easy looking code, readable and open source. Python is ranked as the 3rd most prominent language followed by JavaScript and Java in a survey held in 2018 by Stack Overflow which serves proof to it being the most growing language.

    hashtag
    Features of Python

    Python is currently my favorite and most preferred language to work on because of its simplicity, powerful libraries, and readability. You may be an old school coder or may be completely new to programming, Python is the best way to get started!

    Python is currently my favorite and most preferred language to work on because of its simplicity, powerful libraries, and readability. You may be an old school coder or may be completely new to programming, is the best way to get started!

    Python provides features listed below :

    • Simplicity: Think less of the syntax of the language and more of the code.

    • Open Source: A powerful language and it is free for everyone to use and alter as needed.

    • Portability: Python code can be shared and it would work the same way it was intended to. Seamless and hassle-free.

    To sum it up, Python has a simple syntax, is readable, and has great community support. You may now have the question, What can you do if you know Python? Well, you have a number of options to choose from.

    • Data Scientist

    • Machine Learning and Artificial Intelligence

    • Internet of Things

    Now when you know that Python has such an amazing feature set, why don’t we get started with the Python Basics?

    hashtag
    Jumping to the Python Basics

    To get started off with the Python Basics, you need to first install Python in your system right? So let’s do that right now! You should know that most Linux and Unix distributions these days come with a version of Python out of the box. To set yourself up, you can follow this step-to-step guide.

    Once you are set up, you need to create your first project. Follow these steps:

    • Create Project and enter the name and click create.

    • Right-click on the project folder and create a python file using the New->File->Python File and enter the file name

    You’re done. You have set up your files to start . Are you excited to start coding? Let’s begin. The first and foremost, the “Hello World” program.

    Output: Hello World, Welcome to edureka!

    There you are, that’s your first program. And you can tell by the syntax, that it is super easy to understand. Let us move over to comments in Python Basics.

    hashtag
    Comments in Python

    Single line comment in Python is done using the # symbol and “‘ for multi-line commenting. If you want to know more about comments, you can read this full-fledged guide. Once you know commenting in Python Basics, let’s jump into variables in Python Basics.

    hashtag
    Variables

    Variables in simple words are memory spaces where you can store data or values. But the catch here in Python is that the variables don’t need to be declared before the usage as it is needed in other languages. The data type is automatically assigned to the variable. If you enter an Integer, the data type is assigned as an Integer. You enter a , the variable is assigned a string data type. You get the idea. This makes Python dynamically typed language. You use the assignment operator (=) to assign values to the variables.

    Output: Welcome to edureka! 123 3.142 You can see the way I have assigned the values to those variables. This is how you assign values to variables in Python. And if you are wondering, yes, you can print multiple variables in a single print statement. Now let us go over Data Types in Python Basics.

    hashtag
    Data Types in Python

    Data types are basically data that a language supports such that it is helpful to define real-life data such as salaries, names of employees and so on. The possibilities are endless. The data types are as shown below:

    hashtag
    Numeric Data Types

    As the name suggests, this is to store numerical data types in the variables. You should know that they are immutable, meaning that the specific data in the variable cannot be changed.

    There are 3 numerical data types :

    • Integer: This is just as simple to say that you can store integer values in the variables. Ex : a = 10.

    • Float: Float holds the real numbers and are represented by a decimal and sometimes even scientific notations with E or e indicating the power of 10 (2.5e2 = 2.5 x 102 = 250). Ex: 10.24.

    • Complex Numbers: These are of the form a + bj, where a and b are floats and J represents the square root of -1 (which is an imaginary number). Ex: 10+6j.

    So now that you have understood the various numerical data types, you can understand converting one data type into another data type in this blog of Python Basics.

    hashtag
    Type Conversion

    Type Conversion is the conversion of a data type into another data type which can be really helpful to us when we start programming to obtain solutions for our problems. Let us understand with examples.

    Output: 10.0 3 ‘10+6j’ You can understand, type conversion by the code snippet above. ‘a’ as an integer, ‘b’ as a float and ‘c’ as a complex number. You use the float(), int(), str() methods that are in-built in Python which helps us to convert them. Type Conversion can be really important when you move into real-world examples.

    A simple situation could be where you need to compute the salary of the employees in a company and these should be in a float format but they are supplied to us in the string format. So to make our work easier, you just use type conversion and convert the string of salaries into float and then move forward with our work. Now let us head over to the List data type in Python Basics.

    hashtag
    Lists

    List in simple words can be thought of as in them, i.e, arrays that exist in other languages but with the exception that they can have heterogeneous elementsdifferent data types in the same list. Lists are mutable, meaning that you can change the data that is available in them.

    For those of you who do not know what an array is, you can understand it by imagining a Rack that can hold data in the way you need it to. You can later access the data by calling the position in which it has been stored which is called as Index in a programming language. Lists are defined using either the a=list() method or using a=[] where ‘a’ is the name of the list.

    You can see from the above figure, the data that is stored in the list and the index related to that data stored in the list. Note that the Index in Python always starts with ‘0’. You can now move over to the operations that are possible with Lists.

    List operations are as shown below in the tabular format.

    Now that you have understood the various list functions, let’s move over to understanding Tuples in Python Basics.

    hashtag
    Tuples

    Tuples in Python are the . That means that once you have declared the tuple, you cannot add, delete or update the tuple. Simple as that. This makes same as lists. Just one thing to remember, tuples are immutabletuples much faster than Lists since they are constant values.

    Operations are similar to Lists but the ones where updating, deleting, adding is involved, those operations won’t work. Tuples in Python are written a=() or a=tuple() where ‘a’ is the name of the tuple.

    Output = (‘List’, ‘Dictionary’, ‘Tuple’, ‘Integer’, ‘Float’)

    That basically wraps up most of the things that are needed for tuples as you would use them only in cases when you want a list that has a constant value, hence you use tuples. Let us move over to Dictionaries in Python Basics.

    hashtag
    Dictionary

    Dictionary is best understood when you have a real-world example with us. The most easy and well-understood example would be of the telephone directory. Imagine the telephone directory and understand the various fields that exist in it. There is the Name, Phone, E-Mail and other fields that you can think of. Think of the Name as the key and the name that you enter as the value. Similarly, Phone as key, entered data as value. This is what a dictionary is. It is a structure that holds the key, value pairs.

    Dictionary is written using either the a=dict() or using a={} where a is a dictionary. The key could be either a string or integer which has to be followed by a “:” and the value of that key.

    Output: { ‘Name’ : [‘Akash’, ‘Ankita’], ‘Phone’ : [‘12345’, ‘12354’], ‘E-Mail’ : [‘akash@rail.com’,’ankita@rail.com’]}

    hashtag
    Accessing elements of the Dictionary

    You can see that the keys are Name, Phone, and EMail who each have 2 values assigned to them. When you print the dictionary, the key and value are printed. Now if you wanted to obtain values only for a particular key, you can do the following. This is called accessing elements of the dictionary.

    Output : [‘akash@rail.com’,’ankita@rail.com’]

    hashtag
    Operations of Dictionary

    You may now have a better understanding of dictionaries in Python Basics. Hence let us move over to Sets in this blog of Python Basics.

    hashtag
    Sets

    A set is basically an You can see that even if there are similar elements in set ‘a’, it will still be printed only once because un-ordered collection of elements or items. Elements are sets are a collection of unique elements. unique in the set. In Python, they are written inside curly brackets and separated by commas.

    Output : {1, 2, 3, 4} {3, 4, 5, 6}

    hashtag
    Operations in Sets

    Sets are simple to understand, so let us move over to strings in Python Basics.

    hashtag
    Strings

    Strings in Python are the most used data types, especially because they are easier for us humans to interact with. They are literally words and letters which makes sense as to how they are being used and in what context. Python hits it out of the park because it has such a powerful integration with strings. Strings are written within a single (‘’) or double quotation marks (“”). Strings are immutable meaning that the data in the string cannot be changed at particular indexes.

    The operations of strings with Python can be shown as:

    Note: The string here I use is : mystsr =”edureka! is my place”

    These are just a few of the functions available and you can find more if you search for it.

    hashtag
    Splicing in Strings

    Splicing is breaking the string into the format or the way you want to obtain it.

    That basically sums up the data types in Python. I hope you have a good understanding of the same and if you have any doubts, please leave a comment and I will get back to you as soon as possible.

    Now let us move over to Operators in Python Basics.

    hashtag
    Operators in Python

    Operators are constructs you use to manipulate the data such that you can conclude some sort of solution to us. A simple example would be that if there were 2 friends having 70 rupees each, and you wanted to know the total they each had, you would add the money. In Python, you use the + operator to add the values which would sum up to 140, which is the solution to the problem.

    Python has a list of operators which can be grouped as :

    Let us move ahead and understand each of these operators carefully.

    Note: Variables are called operands that come on the left and right of the operator. Ex :

    Here ‘a’ and ‘b’ are the operands and + is the operator.

    hashtag
    Arithmetic Operator

    They are used to perform arithmetic operations on data.

    The code snippet below will help you understand it better.

    Output : 5, -1, 6, 0.6666666666666666, 2, 8

    Once you have understood what the arithmetic operators are in Python Basics, let us move to assignment operators.

    hashtag
    Assignment Operators

    As the name suggests, these are used to assign values to the variables. Simple as that.

    The various assignment operators are :

    Let us move ahead to comparison operators in this blog of Python Basics.

    hashtag
    Comparison Operators

    These operators are used to bring out the relationship between the left and right operands and derive a solution that you would need. It is as simple as to say that you use them for comparison purposes. The output obtained by these operators will be either true or false depending if the condition is true or not for those values.

    You can see the working of them in the example below :

    Output : a is not equal to b a is greater than b a is either greater than or equal to b

    Let us move ahead with the bitwise operators in the Python Basics.

    hashtag
    Bitwise Operators

    To understand these operators, you need to understand the theory of bits. These operators are used to directly manipulate the bits.

    It would be better to practice this by yourself on a computer. Moving ahead with logical operators in Python Basics.

    hashtag
    Logical Operators

    These are used to obtain a certain logic from the operands. We have 3 operands.

    • and (True if both left and right operands are true)

    • or (True if either one operand is true)

    • not (Gives the opposite of the operand passed)

    Output: False True False

    Moving over to membership operators in Python Basics.

    hashtag
    Membership Operators

    These are used to test whether a particular variable or value exists in either a list, dictionary, tuple, set and so on.

    The operators are :

    • in (True if the value or variable is found in the sequence)

    • not in (True if the value is not found in the sequence)

    Output: No!

    Let us jump ahead to identity operators in Python Basics.

    hashtag
    Identity Operator

    These operators are used to check whether the values, variables are identical or not. As simple as that.

    The operators are :

    • is (True if they are identical)

    • is not (True if they are not identical)

    That right about concludes it for the operators of Python.

    hashtag
    Namespacing and Scopes

    You do remember that everything in Python is an object, right? Well, how does Python know what you are trying to access? Think of a situation where you have 2 functions with the same name. You would still be able to call the function you need. How is that possible? This is where namespacing comes to the rescue.

    Namespacing is the system that Python uses to assign unique names to all the objects in our code. And if you are wondering, objects can be variables and methods. Python does namespacing by maintaining a dictionary structure. Where names act as the keys and the object or variable acts as the values in the structure. Now you would wonder what is a name?

    Well, a is just a way that you use to nameaccess the objects. These names act as a reference to access the values that you assign to them.

    Example: a=5, b=’edureka!’

    If I would want to access the value ‘edureka!’ I would simply call the variable name by ‘b’ and I would have access to ‘edureka!’. These are names. You can even assign methods names and call them accordingly.

    Output: The root is 3.0

    Namespacing works with scopes. Scopes are the validity of a function/variable/value inside the function or class they belong to. Python built-in functions namespacing covers all the other scopes of Python. Functions such as print() and id() etc. can be used even without any imports and be used anywhere. Below them is the global and local namespacing. Let me explain the scope and namespacing in a code snippet below :

    As you can see with the code above, I have declared 2 functions with the name add() and add2(). You have the definition of the add() and you later call the method add(). Here in add() you call add2() and so you are able to get the output of 12 since 3+4+5 is 12. But as soon as you come out of add2(), the scope of p,q,r is terminated meaning that p,q,r are only accessible and available if you are in add2(). Since you are now in add(), there is no p,q,r and hence you get the error and execution stops.

    You can get a better understanding of the scopes and namespacing from the figure below. The built-in scope covers all of Python making them available whenever needed. The global scope covers all of the programs that are being executed. The local scope covers all of the methods being executed in a program. That is basically what namespacing is in Python. Let us move ahead with flow control in Python Basics.

    hashtag
    Flow Control and Conditioning in Python

    You know that code runs sequentially in any language, but what if you want to break that flow such that you are able to add logic and repeat certain statements such that your code reduces and are able to obtain a solution with lesser and smarter code. After all, that is what coding is. Finding logic and solutions to problems and this can be done using loops in Python and conditional statements.

    Conditional statements are executed only if a certain condition is met, else it is skipped ahead to where the condition is satisfied. Conditional statements in Python are the if, elif and else.

    Syntax:

    This means that if a condition is met, do something. Else go through the remaining elif conditions and finally if no condition is met, execute the else block. You can even have nested if-else statements inside the if-else blocks.

    Output: b is larger

    With conditional statements understood, let us move over to loops. You would have certain times when you would want to execute certain statements again and again to obtain a solution or you could apply some logic such that a certain similar kind of statements can be executed using only 2 to 3 lines of code. This is where you use loops in Python.

    Loops can be divided into 2 kinds.

    • Finite: This kind of loop works until a certain condition is met

    • Infinite: This kind of loop works infinitely and does not stop ever.

    Loops in Python or any other language have to test the condition and they can be done either before the statements or after the statements. They are called :

    • Pre-Test Loops: Where the condition is tested first and statements are executed following that

    • Post Test Loops: Where the statement is executed once at least and later the condition is checked.

    You have 2 kinds of loops in Python:

    • for

    • while

    Let us understand each of these loops with syntaxes and code snippets below.

    For Loops: These loops are used to perform a certain set of statements for a given condition and continue until the condition has failed. You know the number of times that you need to execute the for loop.

    Syntax:

    The code snippet is as below :

    Output: apple, orange, pineapple, banana

    This is how the for loops work in Python. Let us move ahead with the while loop in Python Basics.

    While Loops: While loops are the same as the for loops with the exception that you may not know the ending condition. For loop conditions are known but the conditions may not.

    Syntax:

    The code snippet is as :

    Output : 10->9->8->7->6->5->4->3->2->1->Blastoff!

    This is how the while loop works.

    You later have nested loops where you embed a loop into another. The code below should give you an idea.

    Output :

    1

    22

    333

    4444

    55555

    666666

    777777

    88888888

    999999999

    You have the first for loop which prints the string of the number. The other for loop adds the number by 1 and then these loops are executed until the condition is met. That is how for loop works. And that wraps up our session for loops and conditions. Moving ahead with file handling in Python Basics.

    hashtag
    File Handling with Python

    Python has built-in functions that you can use to work with files such as reading and writing data from or to a file. A file object is returned when a file is called using the open() function and then you can do the operations on it such as read, write, modify and so on.

    The flow of working with files is as follows :

    • Open the file using the open() function

    • Perform operations on the file object

    • Close the file using the close() function to avoid any damage to be done with the file

    Syntax:

    Where mode is the way you want to interact with the file. If you do not pass any mode variable, the default is taken as the read mode.

    Example:

    Output: -Welcome to edureka!- -Welcome to edureka!- -Welcome to edureka!- -Welcome to edureka!- -Welcome to edureka!- in mytxt file

    You can go ahead and try more and more with files. Let’s move over to the last topics of the blog. OOPS and objects and classes. Both of these are closely related.

    hashtag
    OOPS

    Older programming languages were structured such that data could be accessed by any module of the code. This could lead to potential security issues that led developers to move over to Object-Oriented Programming that could help us emulate real-world examples into code such that better solutions could be obtained.

    There are 4 concepts of OOPS which are important to understand. They are:

    • Inheritance: Inheritance allows us to derive attributes and methods from the parent class and modify them as per the requirement. The simplest example can be for a car where the structure of a car is described and this class can be derived to describe sports cars, sedans and so on.

    • Encapsulation: Encapsulation is binding data and objects together such that other objects and classes do not access the data. Python has private, protected and public types whose names suggest what they do. Python uses ‘_’ or ‘__’ to specify private or protected keywords.

    s = "If Comrade Napoleon says it, it must be right."
    a = [100, 200, 300]
    
    def foo(arg):
        print(f'arg = {arg}')
    
    class Foo:
        pass
    >>> import mod
    >>> print(mod.s)
    If Comrade Napoleon says it, it must be right.
    >>> mod.a
    [100, 200, 300]
    >>> mod.foo(['quux', 'corge', 'grault'])
    arg = ['quux', 'corge', 'grault']
    >>> x = mod.Foo()
    >>> x
    <mod.Foo object at 0x03C181F0>
    import mod
    >>> import sys
    >>> sys.path
    ['', 'C:\\Users\\john\\Documents\\Python\\doc', 'C:\\Python36\\Lib\\idlelib',
    'C:\\Python36\\python36.zip', 'C:\\Python36\\DLLs', 'C:\\Python36\\lib',
    'C:\\Python36', 'C:\\Python36\\lib\\site-packages']
    >>> sys.path.append(r'C:\Users\john')
    >>> sys.path
    ['', 'C:\\Users\\john\\Documents\\Python\\doc', 'C:\\Python36\\Lib\\idlelib',
    'C:\\Python36\\python36.zip', 'C:\\Python36\\DLLs', 'C:\\Python36\\lib',
    'C:\\Python36', 'C:\\Python36\\lib\\site-packages', 'C:\\Users\\john']
    >>> import mod
    >>> import mod
    >>> mod.__file__
    'C:\\Users\\john\\mod.py'
    
    >>> import re
    >>> re.__file__
    'C:\\Python36\\lib\\re.py'
    import <module_name>
    >>> import mod
    >>> mod
    <module 'mod' from 'C:\\Users\\john\\Documents\\Python\\doc\\mod.py'>
    >>> s
    NameError: name 's' is not defined
    >>> foo('quux')
    NameError: name 'foo' is not defined
    >>> mod.s
    'If Comrade Napoleon says it, it must be right.'
    >>> mod.foo('quux')
    arg = quux
    import <module_name>[, <module_name> ...]
    from <module_name> import <name(s)>
    >>> from mod import s, foo
    >>> s
    'If Comrade Napoleon says it, it must be right.'
    >>> foo('quux')
    arg = quux
    
    >>> from mod import Foo
    >>> x = Foo()
    >>> x
    <mod.Foo object at 0x02E3AD50>
    >>> a = ['foo', 'bar', 'baz']
    >>> a
    ['foo', 'bar', 'baz']
    
    >>> from mod import a
    >>> a
    [100, 200, 300]
    from <module_name> import *
    >>> from mod import *
    >>> s
    'If Comrade Napoleon says it, it must be right.'
    >>> a
    [100, 200, 300]
    >>> foo
    <function foo at 0x03B449C0>
    >>> Foo
    <class 'mod.Foo'>
    from <module_name> import <name> as <alt_name>[, <name> as <alt_name> …]
    >>> s = 'foo'
    >>> a = ['foo', 'bar', 'baz']
    
    >>> from mod import s as string, a as alist
    >>> s
    'foo'
    >>> string
    'If Comrade Napoleon says it, it must be right.'
    >>> a
    ['foo', 'bar', 'baz']
    >>> alist
    [100, 200, 300]
    import <module_name> as <alt_name>
    >>> import mod as my_module
    >>> my_module.a
    [100, 200, 300]
    >>> my_module.foo('qux')
    arg = qux
    >>> def bar():
    ...     from mod import foo
    ...     foo('corge')
    ...
    
    >>> bar()
    arg = corge
    >>> def bar():
    ...     from mod import *
    ...
    SyntaxError: import * only allowed at module level
    >>> try:
    ...     # Non-existent module
    ...     import baz
    ... except ImportError:
    ...     print('Module not found')
    ...
    
    Module not found
    >>> try:
    ...     # Existing module, but non-existent object
    ...     from mod import baz
    ... except ImportError:
    ...     print('Object not found in module')
    ...
    
    Object not found in module
    >>> dir()
    ['__annotations__', '__builtins__', '__doc__', '__loader__', '__name__',
    '__package__', '__spec__']
    
    >>> qux = [1, 2, 3, 4, 5]
    >>> dir()
    ['__annotations__', '__builtins__', '__doc__', '__loader__', '__name__',
    '__package__', '__spec__', 'qux']
    
    >>> class Bar():
    ...     pass
    ...
    >>> x = Bar()
    >>> dir()
    ['Bar', '__annotations__', '__builtins__', '__doc__', '__loader__', '__name__',
    '__package__', '__spec__', 'qux', 'x']
    >>> dir()
    ['__annotations__', '__builtins__', '__doc__', '__loader__', '__name__',
    '__package__', '__spec__']
    
    >>> import mod
    >>> dir()
    ['__annotations__', '__builtins__', '__doc__', '__loader__', '__name__',
    '__package__', '__spec__', 'mod']
    >>> mod.s
    'If Comrade Napoleon says it, it must be right.'
    >>> mod.foo([1, 2, 3])
    arg = [1, 2, 3]
    
    >>> from mod import a, Foo
    >>> dir()
    ['Foo', '__annotations__', '__builtins__', '__doc__', '__loader__', '__name__',
    '__package__', '__spec__', 'a', 'mod']
    >>> a
    [100, 200, 300]
    >>> x = Foo()
    >>> x
    <mod.Foo object at 0x002EAD50>
    
    >>> from mod import s as string
    >>> dir()
    ['Foo', '__annotations__', '__builtins__', '__doc__', '__loader__', '__name__',
    '__package__', '__spec__', 'a', 'mod', 'string', 'x']
    >>> string
    'If Comrade Napoleon says it, it must be right.'
    >>> import mod
    >>> dir(mod)
    ['Foo', '__builtins__', '__cached__', '__doc__', '__file__', '__loader__',
    '__name__', '__package__', '__spec__', 'a', 'foo', 's']
    >>> dir()
    ['__annotations__', '__builtins__', '__doc__', '__loader__', '__name__',
    '__package__', '__spec__']
    >>> from mod import *
    >>> dir()
    ['Foo', '__annotations__', '__builtins__', '__doc__', '__loader__', '__name__',
    '__package__', '__spec__', 'a', 'foo', 's']
    s = "If Comrade Napoleon says it, it must be right."
    a = [100, 200, 300]
    
    def foo(arg):
        print(f'arg = {arg}')
    
    class Foo:
        pass
    C:\Users\john\Documents>python mod.py
    C:\Users\john\Documents>
    s = "If Comrade Napoleon says it, it must be right."
    a = [100, 200, 300]
    
    def foo(arg):
        print(f'arg = {arg}')
    
    class Foo:
        pass
    
    print(s)
    print(a)
    foo('quux')
    x = Foo()
    print(x)
    C:\Users\john\Documents>python mod.py
    If Comrade Napoleon says it, it must be right.
    [100, 200, 300]
    arg = quux
    <__main__.Foo object at 0x02F101D0>
    >>> import mod
    If Comrade Napoleon says it, it must be right.
    [100, 200, 300]
    arg = quux
    <mod.Foo object at 0x0169AD50>
    s = "If Comrade Napoleon says it, it must be right."
    a = [100, 200, 300]
    
    def foo(arg):
        print(f'arg = {arg}')
    
    class Foo:
        pass
    
    if (__name__ == '__main__'):
        print('Executing as standalone script')
        print(s)
        print(a)
        foo('quux')
        x = Foo()
        print(x)
    C:\Users\john\Documents>python mod.py
    Executing as standalone script
    If Comrade Napoleon says it, it must be right.
    [100, 200, 300]
    arg = quux
    <__main__.Foo object at 0x03450690>
    >>> import mod
    >>> mod.foo('grault')
    arg = grault
    def fact(n):
        return 1 if n == 1 else n * fact(n-1)
    
    if (__name__ == '__main__'):
        import sys
        if len(sys.argv) > 1:
            print(fact(int(sys.argv[1])))
    >>> from fact import fact
    >>> fact(6)
    720
    C:\Users\john\Documents>python fact.py 6
    720
    a = [100, 200, 300]
    print('a =', a)
    >>> import mod
    a = [100, 200, 300]
    >>> import mod
    >>> import mod
    
    >>> mod.a
    [100, 200, 300]
    >>> import mod
    a = [100, 200, 300]
    
    >>> import mod
    
    >>> import importlib
    >>> importlib.reload(mod)
    a = [100, 200, 300]
    <module 'mod' from 'C:\\Users\\john\\Documents\\Python\\doc\\mod.py'>
    def foo():
        print('[mod1] foo()')
    
    class Foo:
        pass
    def bar():
        print('[mod2] bar()')
    
    class Bar:
        pass
    import <module_name>[, <module_name> ...]
    >>> import pkg.mod1, pkg.mod2
    >>> pkg.mod1.foo()
    [mod1] foo()
    >>> x = pkg.mod2.Bar()
    >>> x
    <pkg.mod2.Bar object at 0x033F7290>
    from <module_name> import <name(s)>
    >>> from pkg.mod1 import foo
    >>> foo()
    [mod1] foo()
    from <module_name> import <name> as <alt_name>
    >>> from pkg.mod2 import Bar as Qux
    >>> x = Qux()
    >>> x
    <pkg.mod2.Bar object at 0x036DFFD0>
    from <package_name> import <modules_name>[, <module_name> ...]
    from <package_name> import <module_name> as <alt_name>
    >>> from pkg import mod1
    >>> mod1.foo()
    [mod1] foo()
    
    >>> from pkg import mod2 as quux
    >>> quux.bar()
    [mod2] bar()
    >>> import pkg
    >>> pkg
    <module 'pkg' (namespace)>
    >>> pkg.mod1
    Traceback (most recent call last):
      File "<pyshell#34>", line 1, in <module>
        pkg.mod1
    AttributeError: module 'pkg' has no attribute 'mod1'
    >>> pkg.mod1.foo()
    Traceback (most recent call last):
      File "<pyshell#35>", line 1, in <module>
        pkg.mod1.foo()
    AttributeError: module 'pkg' has no attribute 'mod1'
    >>> pkg.mod2.Bar()
    Traceback (most recent call last):
      File "<pyshell#36>", line 1, in <module>
        pkg.mod2.Bar()
    AttributeError: module 'pkg' has no attribute 'mod2'
    print(f'Invoking __init__.py for {__name__}')
    A = ['quux', 'corge', 'grault']
    >>> import pkg
    Invoking __init__.py for pkg
    >>> pkg.A
    ['quux', 'corge', 'grault']
    def foo():
        from pkg import A
        print('[mod1] foo() / A = ', A)
    
    class Foo:
        pass
    >>> from pkg import mod1
    Invoking __init__.py for pkg
    >>> mod1.foo()
    [mod1] foo() / A =  ['quux', 'corge', 'grault']
    print(f'Invoking __init__.py for {__name__}')
    import pkg.mod1, pkg.mod2
    >>> import pkg
    Invoking __init__.py for pkg
    >>> pkg.mod1.foo()
    [mod1] foo()
    >>> pkg.mod2.bar()
    [mod2] bar()
    def foo():
        print('[mod1] foo()')
    
    class Foo:
        pass
    def bar():
        print('[mod2] bar()')
    
    class Bar:
        pass
    def baz():
        print('[mod3] baz()')
    
    class Baz:
        pass
    def qux():
        print('[mod4] qux()')
    
    class Qux:
        pass
    >>> dir()
    ['__annotations__', '__builtins__', '__doc__', '__loader__', '__name__',
    '__package__', '__spec__']
    
    >>> from pkg.mod3 import *
    
    >>> dir()
    ['Baz', '__annotations__', '__builtins__', '__doc__', '__loader__', '__name__',
    '__package__', '__spec__', 'baz']
    >>> baz()
    [mod3] baz()
    >>> Baz
    <class 'pkg.mod3.Baz'>
    from <package_name> import *
    >>> dir()
    ['__annotations__', '__builtins__', '__doc__', '__loader__', '__name__',
    '__package__', '__spec__']
    
    >>> from pkg import *
    >>> dir()
    ['__annotations__', '__builtins__', '__doc__', '__loader__', '__name__',
    '__package__', '__spec__']
    __all__ = [
            'mod1',
            'mod2',
            'mod3',
            'mod4'
            ]
    >>> dir()
    ['__annotations__', '__builtins__', '__doc__', '__loader__', '__name__',
    '__package__', '__spec__']
    
    >>> from pkg import *
    >>> dir()
    ['__annotations__', '__builtins__', '__doc__', '__loader__', '__name__',
    '__package__', '__spec__', 'mod1', 'mod2', 'mod3', 'mod4']
    >>> mod2.bar()
    [mod2] bar()
    >>> mod4.Qux
    <class 'pkg.mod4.Qux'>
    __all__ = ['foo']
    
    def foo():
        print('[mod1] foo()')
    
    class Foo:
        pass
    >>> dir()
    ['__annotations__', '__builtins__', '__doc__', '__loader__', '__name__',
    '__package__', '__spec__']
    
    >>> from pkg.mod1 import *
    >>> dir()
    ['__annotations__', '__builtins__', '__doc__', '__loader__', '__name__',
    '__package__', '__spec__', 'foo']
    
    >>> foo()
    [mod1] foo()
    >>> Foo
    Traceback (most recent call last):
      File "<pyshell#37>", line 1, in <module>
        Foo
    NameError: name 'Foo' is not defined
    >>> import pkg.sub_pkg1.mod1
    >>> pkg.sub_pkg1.mod1.foo()
    [mod1] foo()
    
    >>> from pkg.sub_pkg1 import mod2
    >>> mod2.bar()
    [mod2] bar()
    
    >>> from pkg.sub_pkg2.mod3 import baz
    >>> baz()
    [mod3] baz()
    
    >>> from pkg.sub_pkg2.mod4 import qux as grault
    >>> grault()
    [mod4] qux()
    def baz():
        print('[mod3] baz()')
    
    class Baz:
        pass
    
    from pkg.sub_pkg1.mod1 import foo
    foo()
    >>> from pkg.sub_pkg2 import mod3
    [mod1] foo()
    >>> mod3.foo()
    [mod1] foo()
    def baz():
        print('[mod3] baz()')
    
    class Baz:
        pass
    
    from .. import sub_pkg1
    print(sub_pkg1)
    
    from ..sub_pkg1.mod1 import foo
    foo()
    >>> from pkg.sub_pkg2 import mod3
    <module 'pkg.sub_pkg1' (namespace)>
    [mod1] foo()
    if __name__ == "__main__":
        # execute only if run as a script
        main()
    parent/
        __init__.py
        one/
            __init__.py
        two/
            __init__.py
        three/
            __init__.py
    module = None
    if spec.loader is not None and hasattr(spec.loader, 'create_module'):
        # It is assumed 'exec_module' will also be defined on the loader.
        module = spec.loader.create_module(spec)
    if module is None:
        module = ModuleType(spec.name)
    # The import-related module attributes get set here:
    _init_module_attrs(spec, module)
    
    if spec.loader is None:
        # unsupported
        raise ImportError
    if spec.origin is None and spec.submodule_search_locations is not None:
        # namespace package
        sys.modules[spec.name] = module
    elif not hasattr(spec.loader, 'exec_module'):
        module = spec.loader.load_module(spec.name)
        # Set __loader__ and __package__ if missing.
    else:
        sys.modules[spec.name] = module
        try:
            spec.loader.exec_module(module)
        except BaseException:
            try:
                del sys.modules[spec.name]
            except KeyError:
                pass
            raise
    return sys.modules[spec.name]
    spam/
        __init__.py
        foo.py
        bar.py
    from .foo import Foo
    from .bar import Bar
    >>> import spam
    >>> spam.foo
    <module 'spam.foo' from '/tmp/imports/spam/foo.py'>
    >>> spam.bar
    <module 'spam.bar' from '/tmp/imports/spam/bar.py'>
    package/
        __init__.py
        subpackage1/
            __init__.py
            moduleX.py
            moduleY.py
        subpackage2/
            __init__.py
            moduleZ.py
        moduleA.py
    from .moduleY import spam
    from .moduleY import spam as ham
    from . import moduleY
    from ..subpackage1 import moduleY
    from ..subpackage2.moduleZ import eggs
    from ..moduleA import foo
    import XXX.YYY.ZZZ

    Being Embeddable & Extensible: Python can have snippets of other languages inside it to perform certain functions.

  • Being Interpreted: The worries of large memory tasks and other heavy CPU tasks are taken care of by Python itself leaving you to worry only about coding.

  • Huge amount of libraries: Data Science Python has you covered. Web Development? Python still has you covered. Always.

  • Object Orientation: Objects help breaking-down complex real-life problems into such that they can be coded and solved to obtain solutions.

  • Web Development
  • Data Visualization

  • Automation

  • Polymorphism: This allows us to have a common interface for various types of data that it takes. You can have similar function names with differing data passed to them.
  • Abstraction can be used to Abstraction: simplify complex reality by modeling classes appropriate to the problem.

  • coding with Pythonarrow-up-right
    stringarrow-up-right
    while looparrow-up-right
    print('Hello World, Welcome to edureka!')
    a = 'Welcome to edureka!'
    b = 123
    c = 3.142
    print(a, b, c)
    a = 10 
    b= 3.142 
    c = 10+6j
    a = 10 
    b = 3.142 
    c = 10+6j 
    print(int(b), float(a), str(c))
    a = ('List', 'Dictionary', 'Tuple', 'Integer', 'Float') 
    print(a)
    MyPhoneBook = { 'Name' : [ 'Akash', 'Ankita' ] ,
    'Phone' : [ '12345', '12354' ] ,
    'E-Mail' : [ 'akash@rail.com', 'ankita@rail.com' ]}
    print (MyPhoneBook)
    print(MyPhoneBook['E-Mail'])
    a = {1, 2, 3, 4, 4, 4} 
    b = {3, 4, 5, 6} 
    print(a,b)
    a=10 
    b=20 
    a+b
    a = 2 
    b = 3 
    print(a+b, a-b, a*b, a/b, a%b, a**b, end=',')
    a = 21
    b = 10
    if a == b:
        print ( 'a is equal to b' )
    if a != b
        print ( 'a is not equal to b' )
    if a < b:
        print ( 'a is less than b' )
    if a > b: 
        print ( 'a is greater than b' ) 
    if a <= b: 
        print ( 'a is either less than or equal to b' ) 
    if a >= b:
        print ( 'a is either greater than or equal to b' )
    a = True 
    b = False 
    print(a and b, a or b, not a)
    a = [1, 2, 3, 4]
    if 5 in a:
        print('Yes!')
    if 5 not in a:
        print('No!')
    a = 5
    b = 5
    if a is b:
        print('Similar')
    if a is not b:
        print('Not Similar!')
    import math
    square_root = math.sqrt
    print('The square root is ',square_root(9))
    def add():
        x = 3
        y = 2
        def add2():
            p, q, r = 3, 4, 5
            print('Inside add2 printing sum of 3 numbers:'(p+q+r))
        add2()
        print('The values of p, q, r are :', p, q, r)
        print('Inside the add printing sum of 2 numbers:'(x+y))
    add()
    if condition:
        statement
    elif condition:
        statement
    else:
        statement
    a = 10
    b = 15
    if a == b: 
        print ( 'They are equal' ) 
    elif a > b: 
        print ( 'a is larger' ) 
    else : 
        print ( 'b is larger' )
    for variable in range: statements
    basket_of_fruits= ['apple', 'orange', 'pineapple', 'banana']
    for fruit in basket_of_fruits:
        print(fruit, end=',')
    while condition: 
         statements
    second = 10
    while second >= 0: 
        print(second, end='->')
        second-=1
    print('Blastoff!')
    count = 1
    for i in range(10):
        print(str(i) * i)
        for j in range(0, i):
            count = count+1
    File_object = open('filename','r')
    file = open('mytxt','w')
    string = ' --Welcome to edureka!-- '
    for i in range(5):
        file.write(string)
    file.close()
    Image of a Python package
    Illustration of hierarchical file structure of Python packages
    Illustration of hierarchical file structure of Python packages
    Illustration of hierarchical file structure of Python packages